A8: Final Project
tldr: Plan A didn’t happen because of complications acquiring a specific tool on time. Thank you plan B for working out.
Digitally Handmade
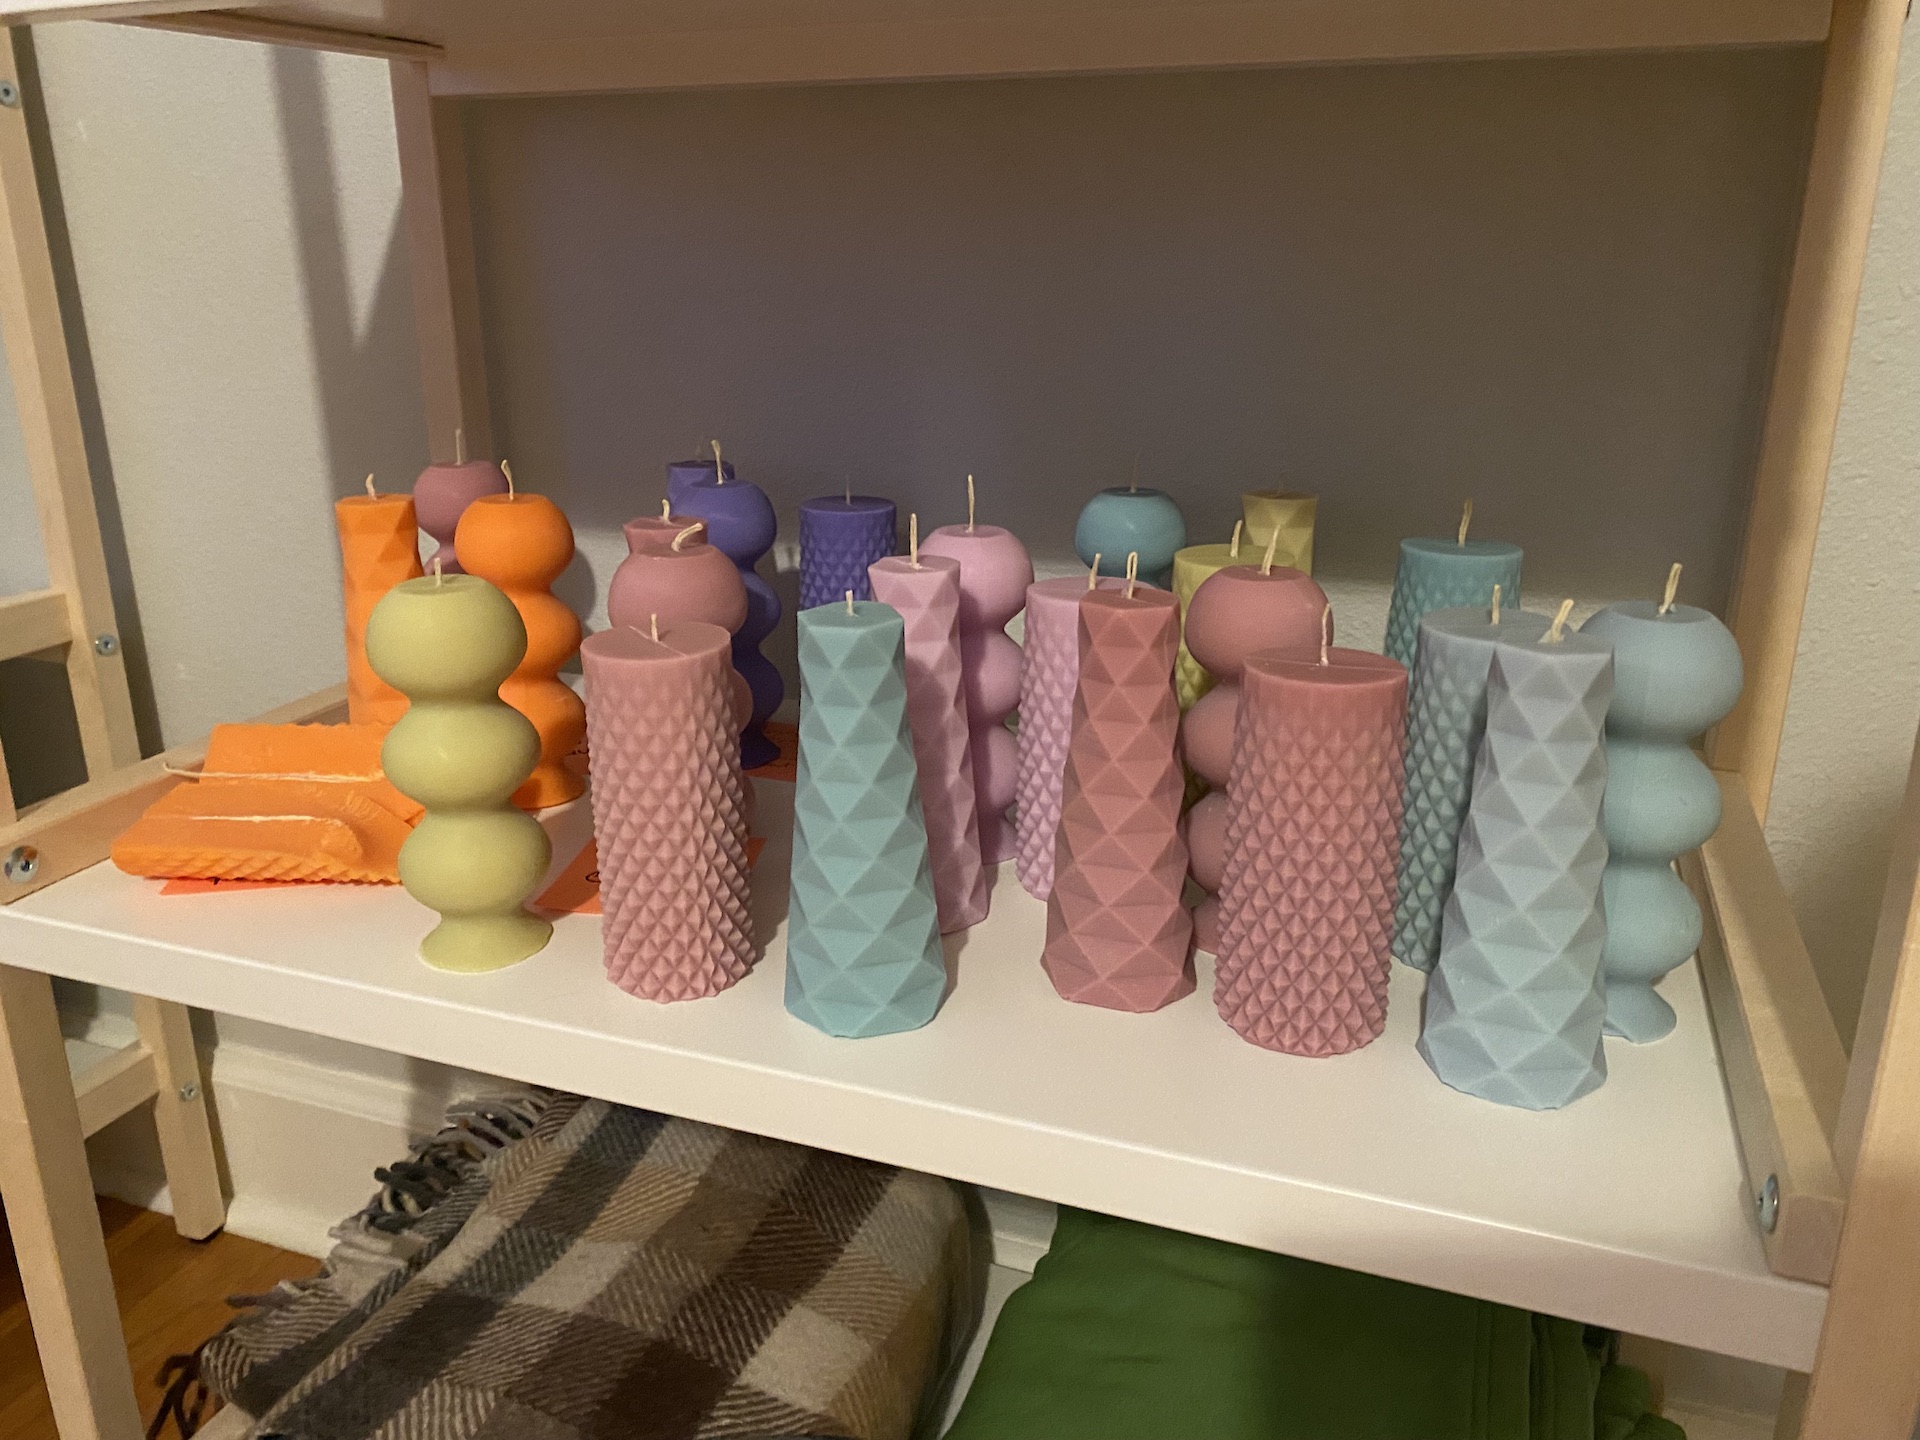
I was inspired and energized by the casting and mold making assignment where I cast candles. What I liked about that assignment was that digital farbication was used to create a final piece that still resembled an aspect of the hand crafted. I discovered so many aspects of candle making I wanted to explore further. For my final project I decided to make more candles using parametric modeling to design the form, and adding color and scent (aspects of candle makingt that I didn’t get to play with during the casting and mold making assignment). To complement the candles I created simple wood block paper prints made with laser cut wood blocks.
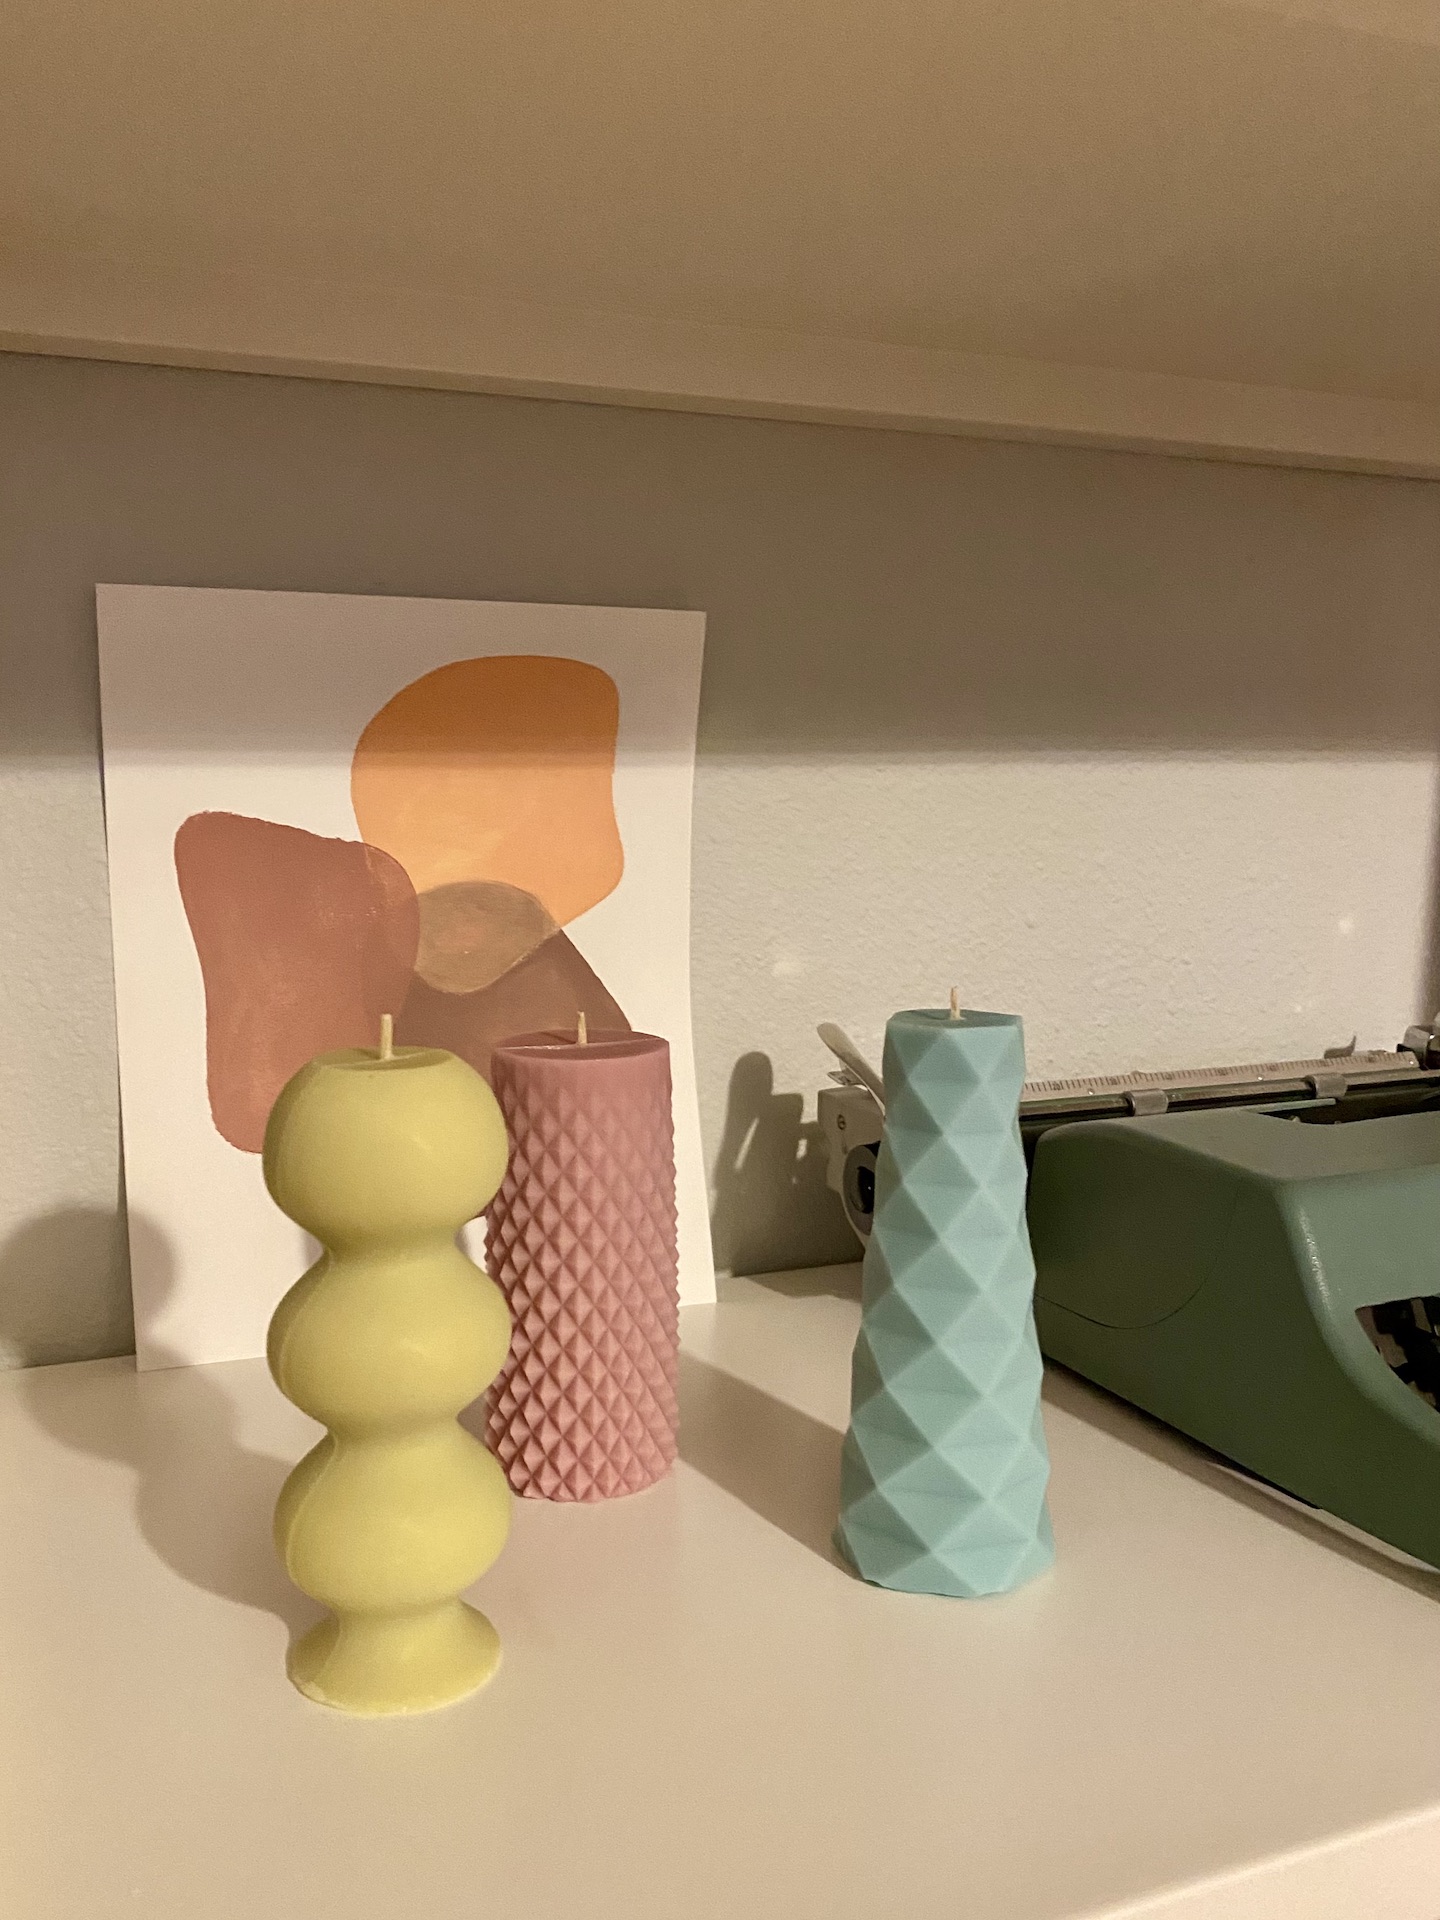
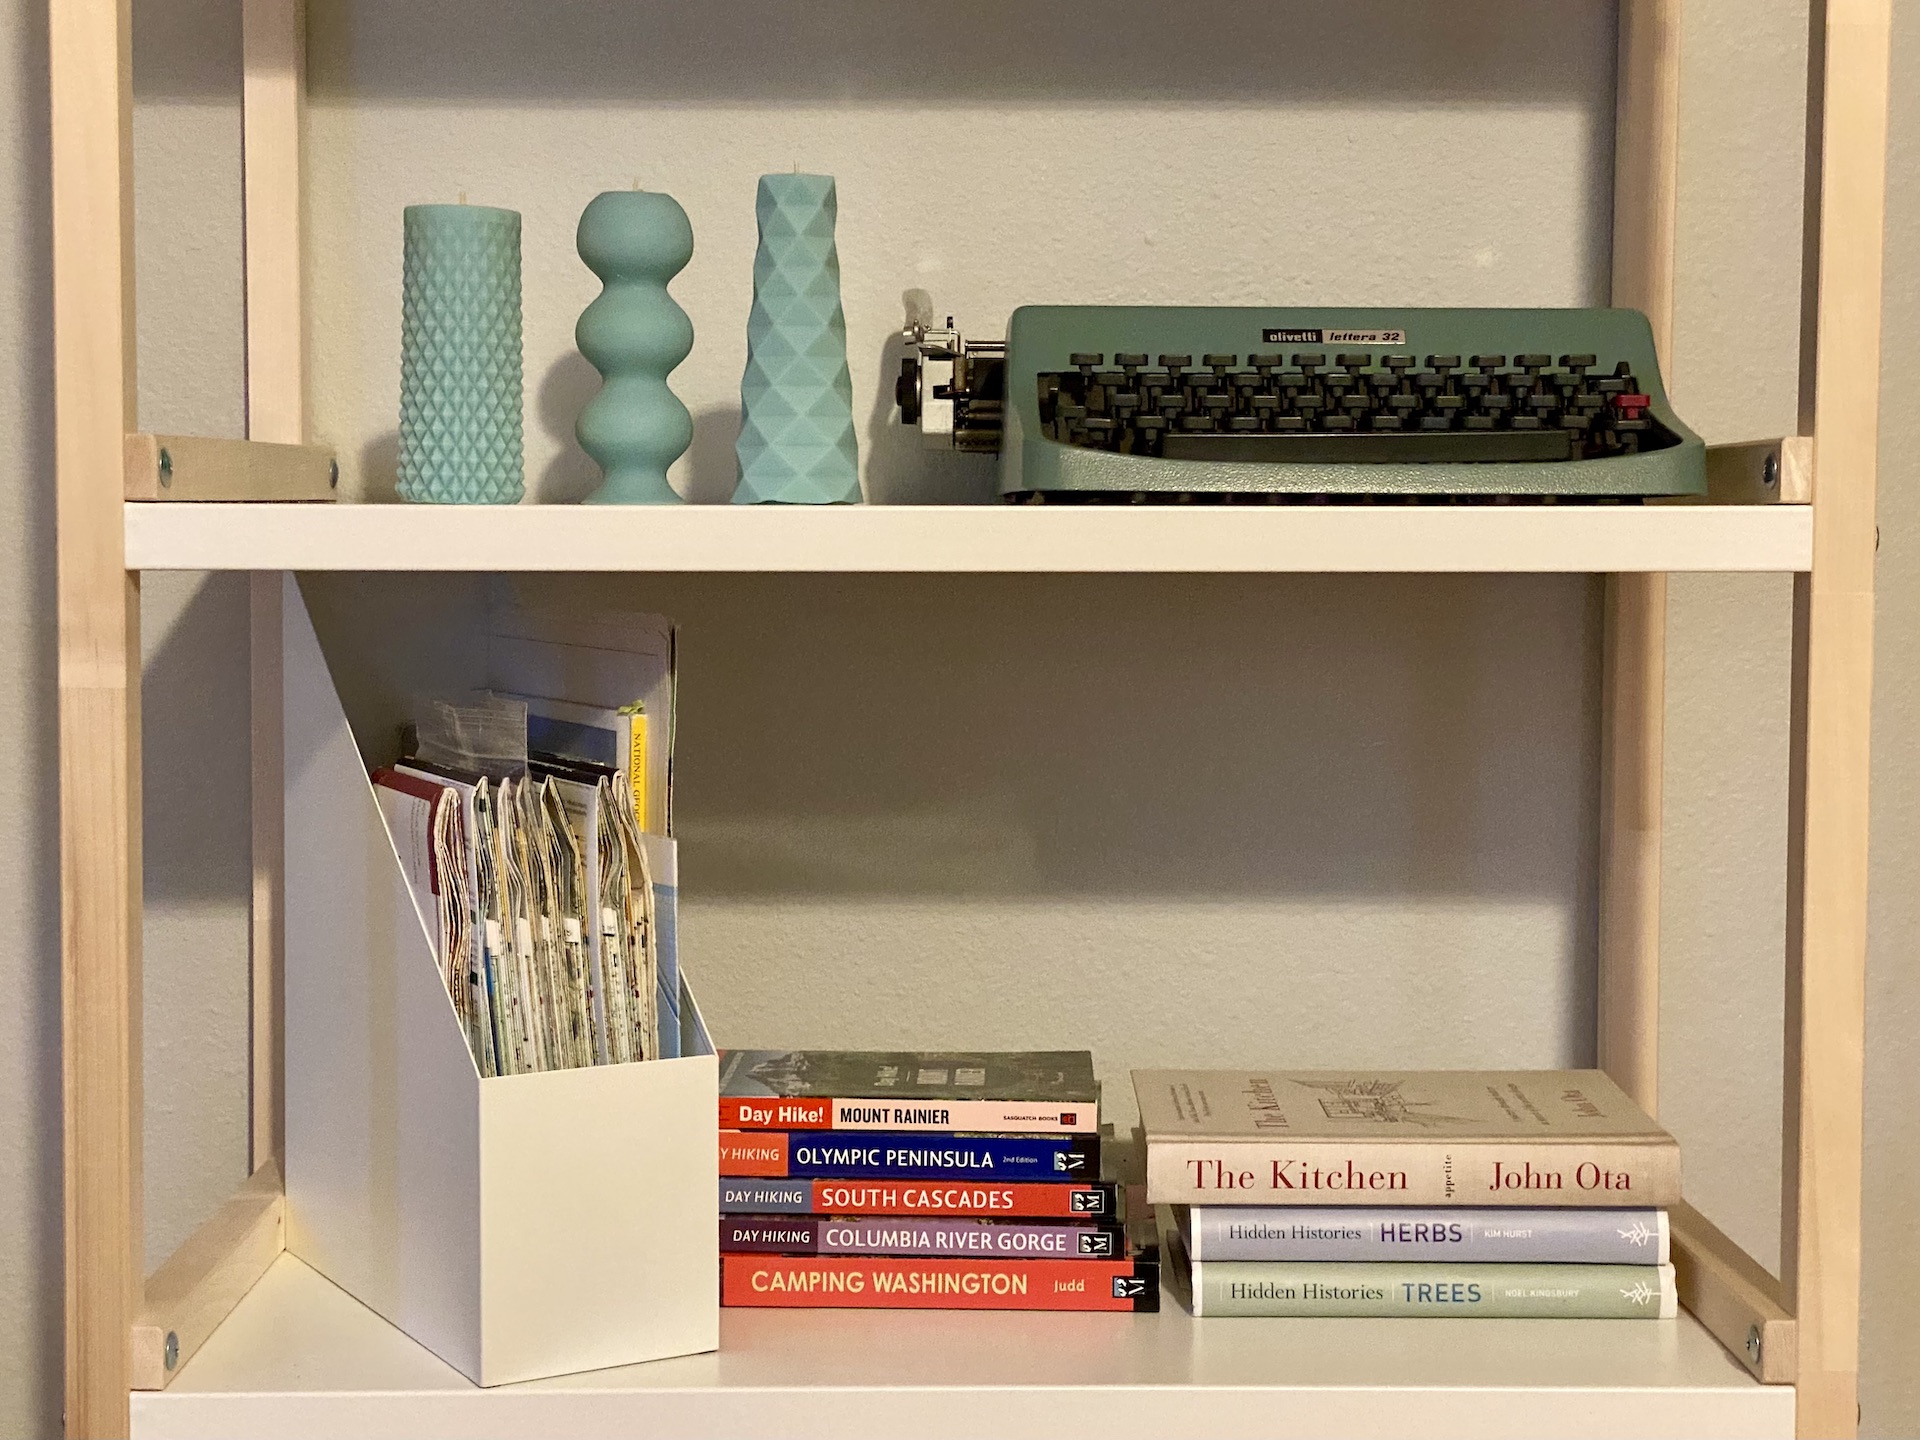
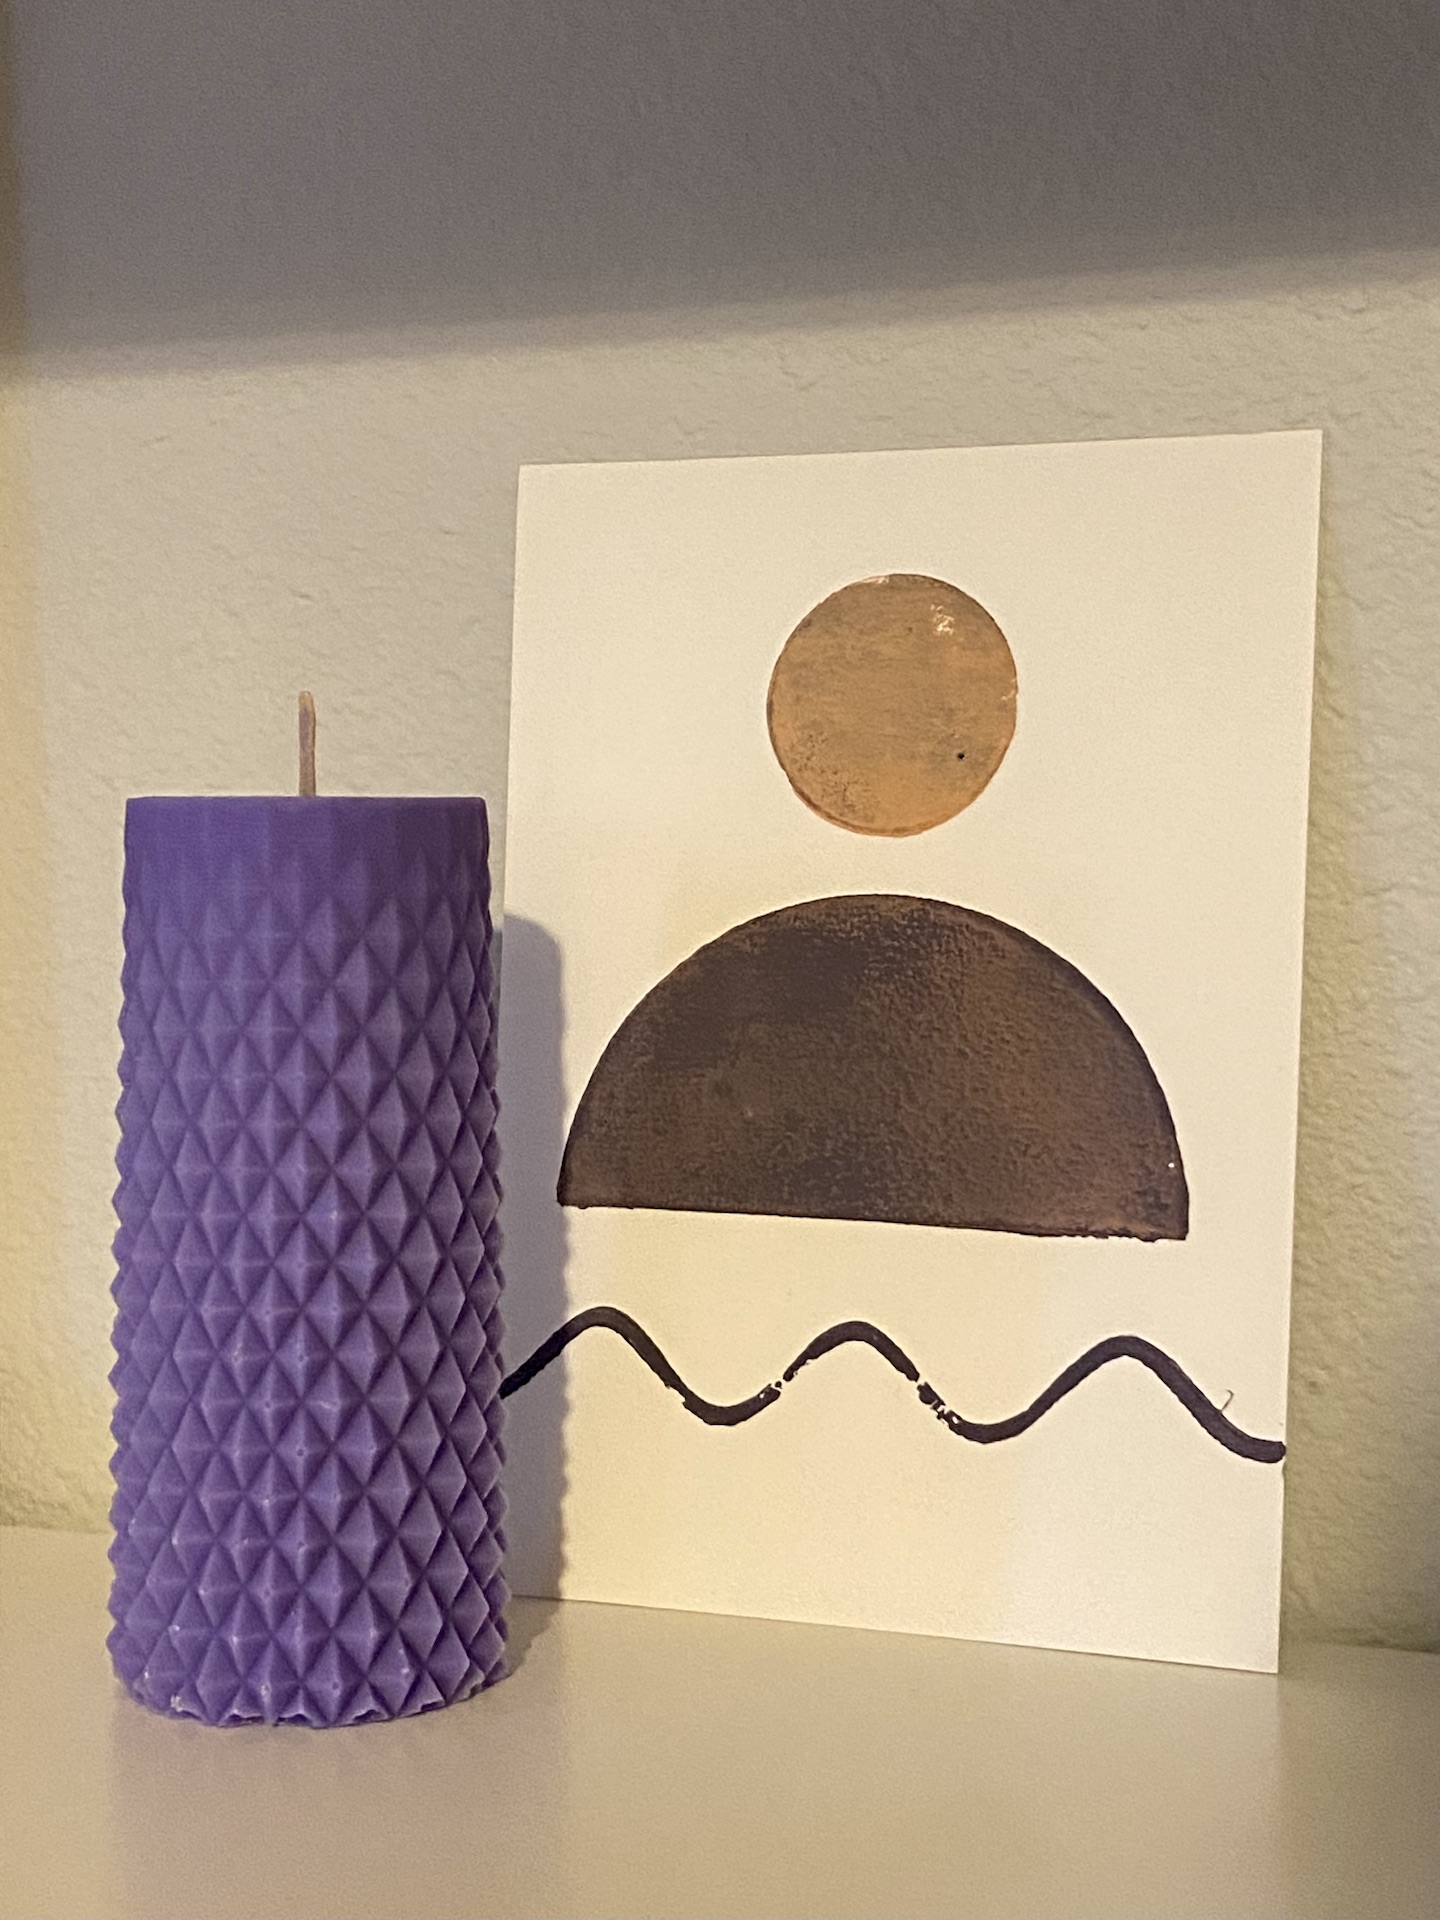
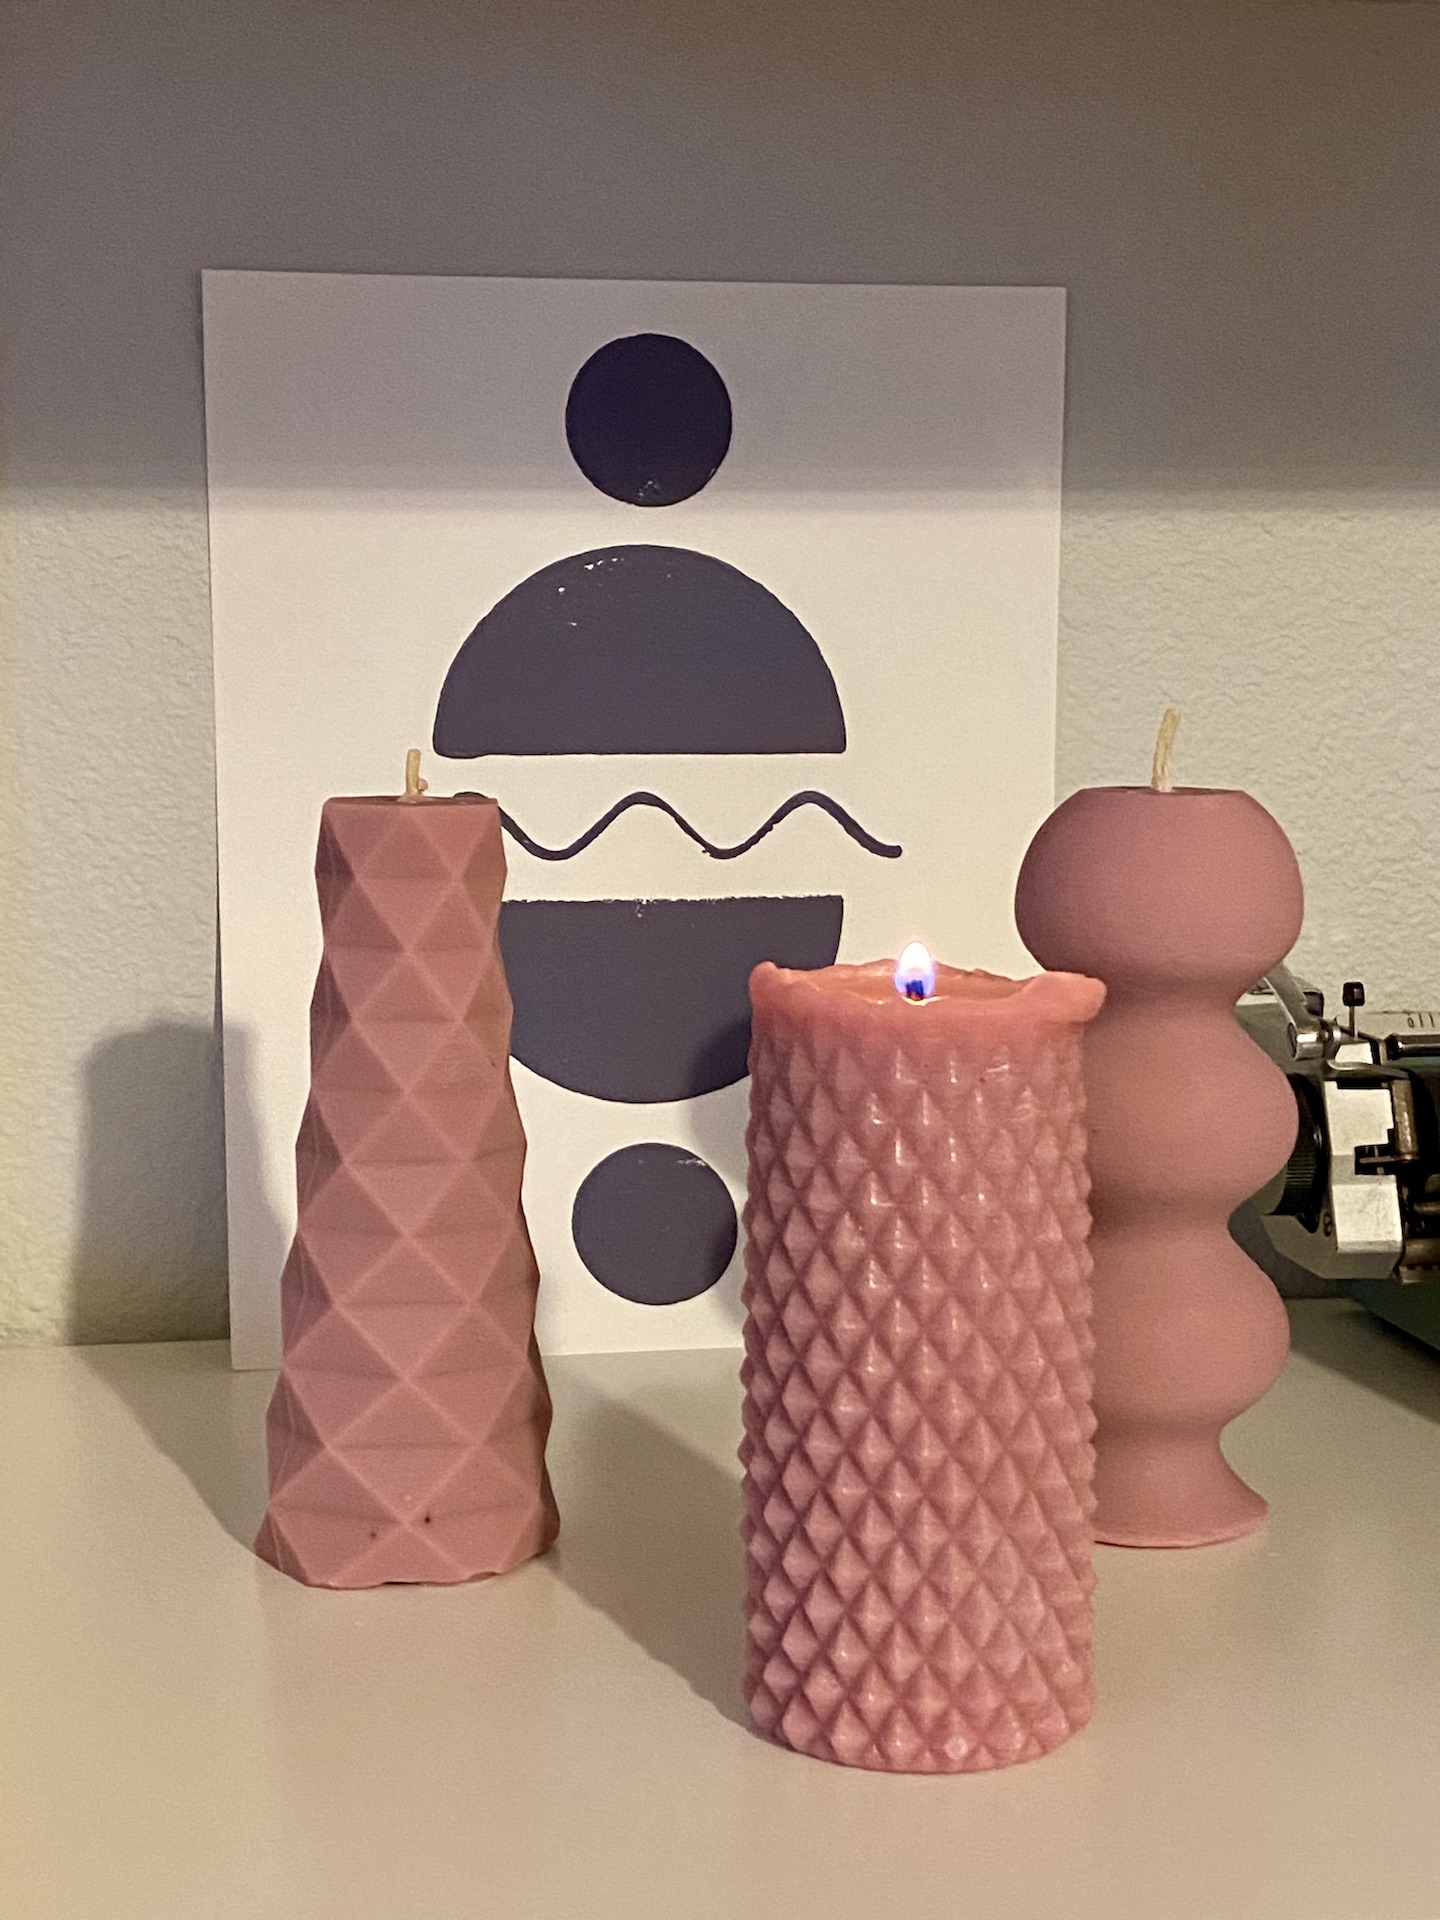
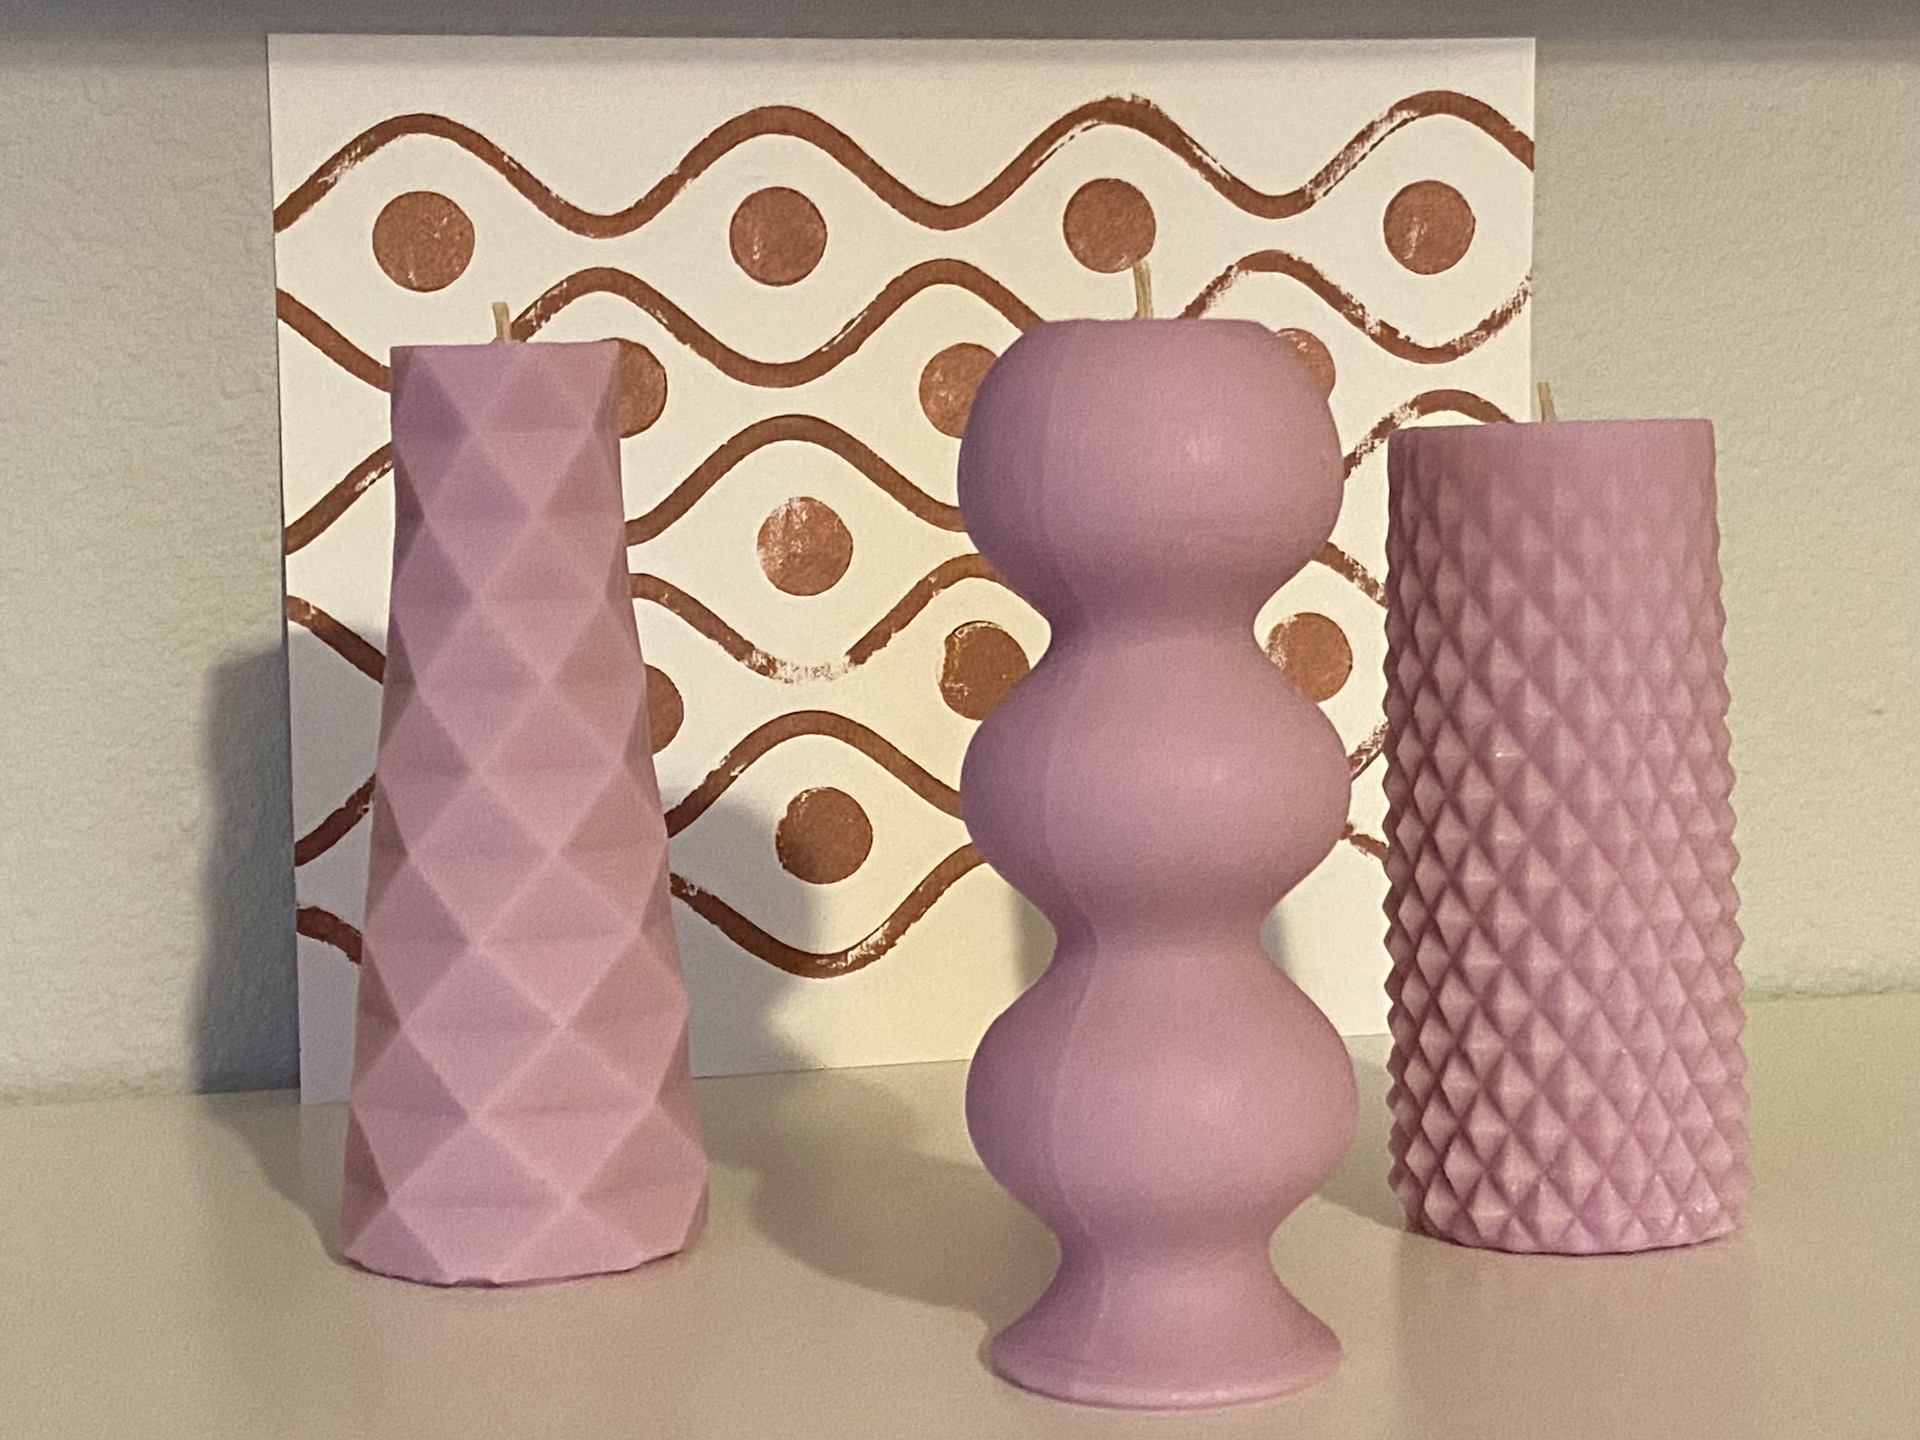
The concept driving my final project was how might I use digital fabrication techniques to aid a process that evokes a handmade quality in the final product. Here are my final candle designs and block prints.
Process
The digital fabrication techniques I used in this project were 3D modeling with Rhino and Grasshopper, 3D printing, Mold Design, and Laser Cutting.
Modeling
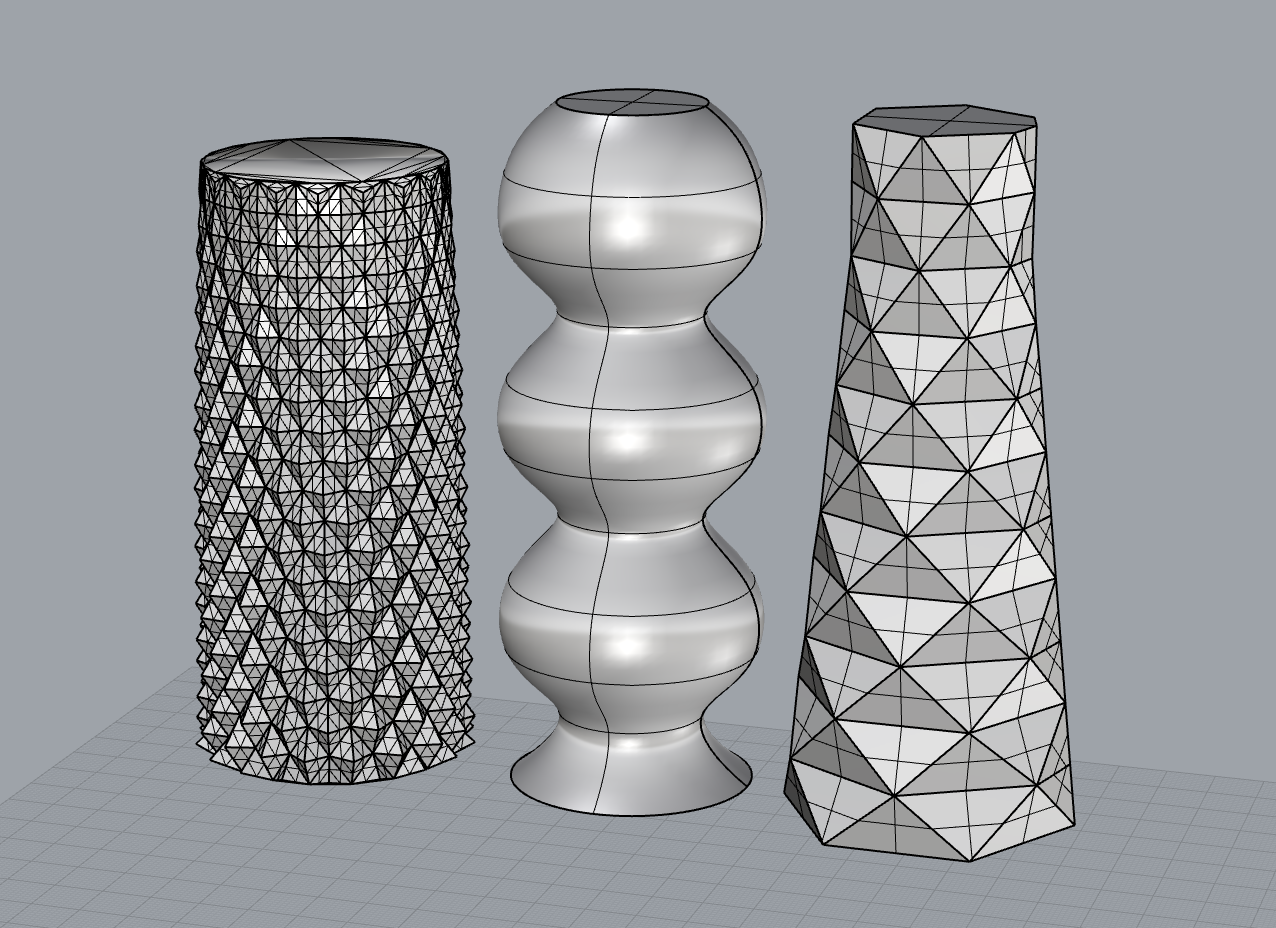
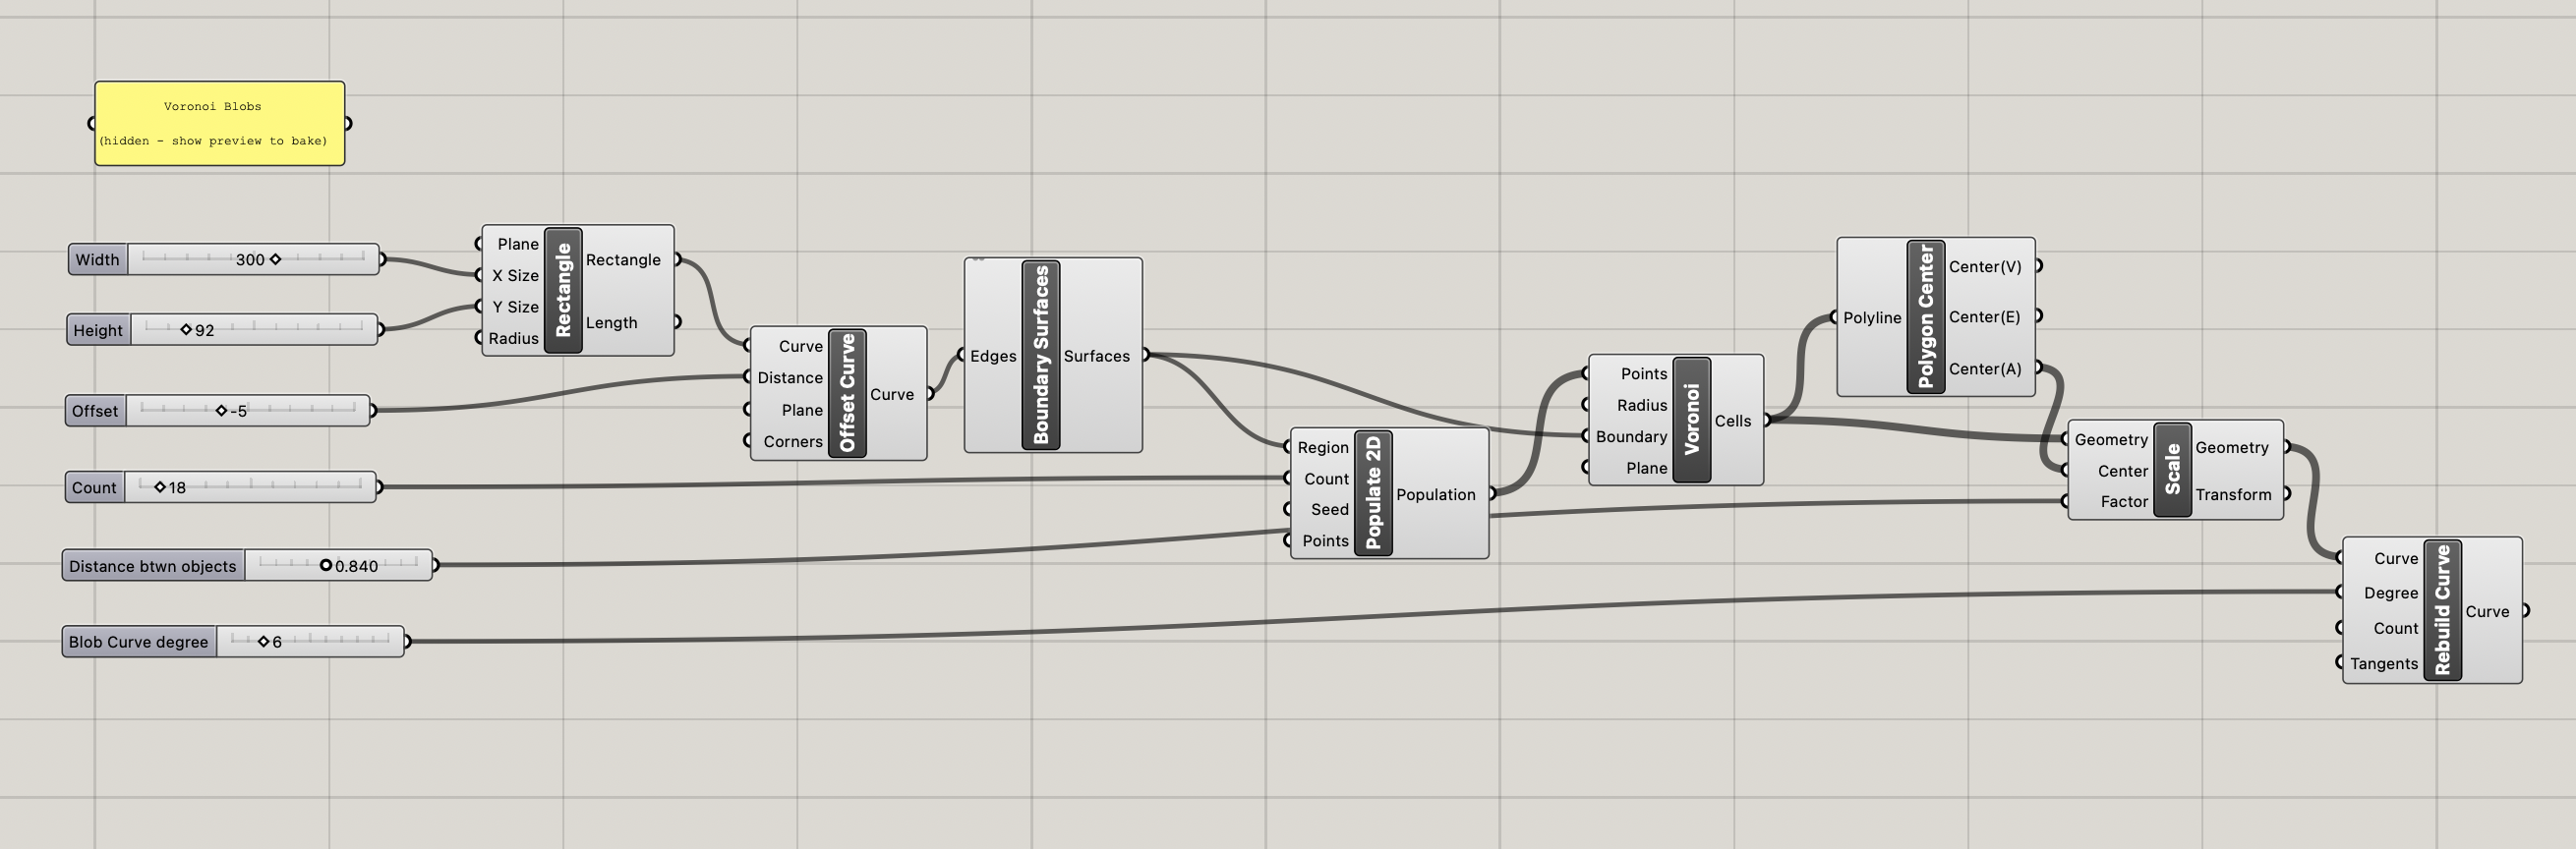
I used parametric modeling to create the forms for both the candles and the wooden printing blocks. This was a good opportunity for me to continue working on my grasshopper skills.
Candles
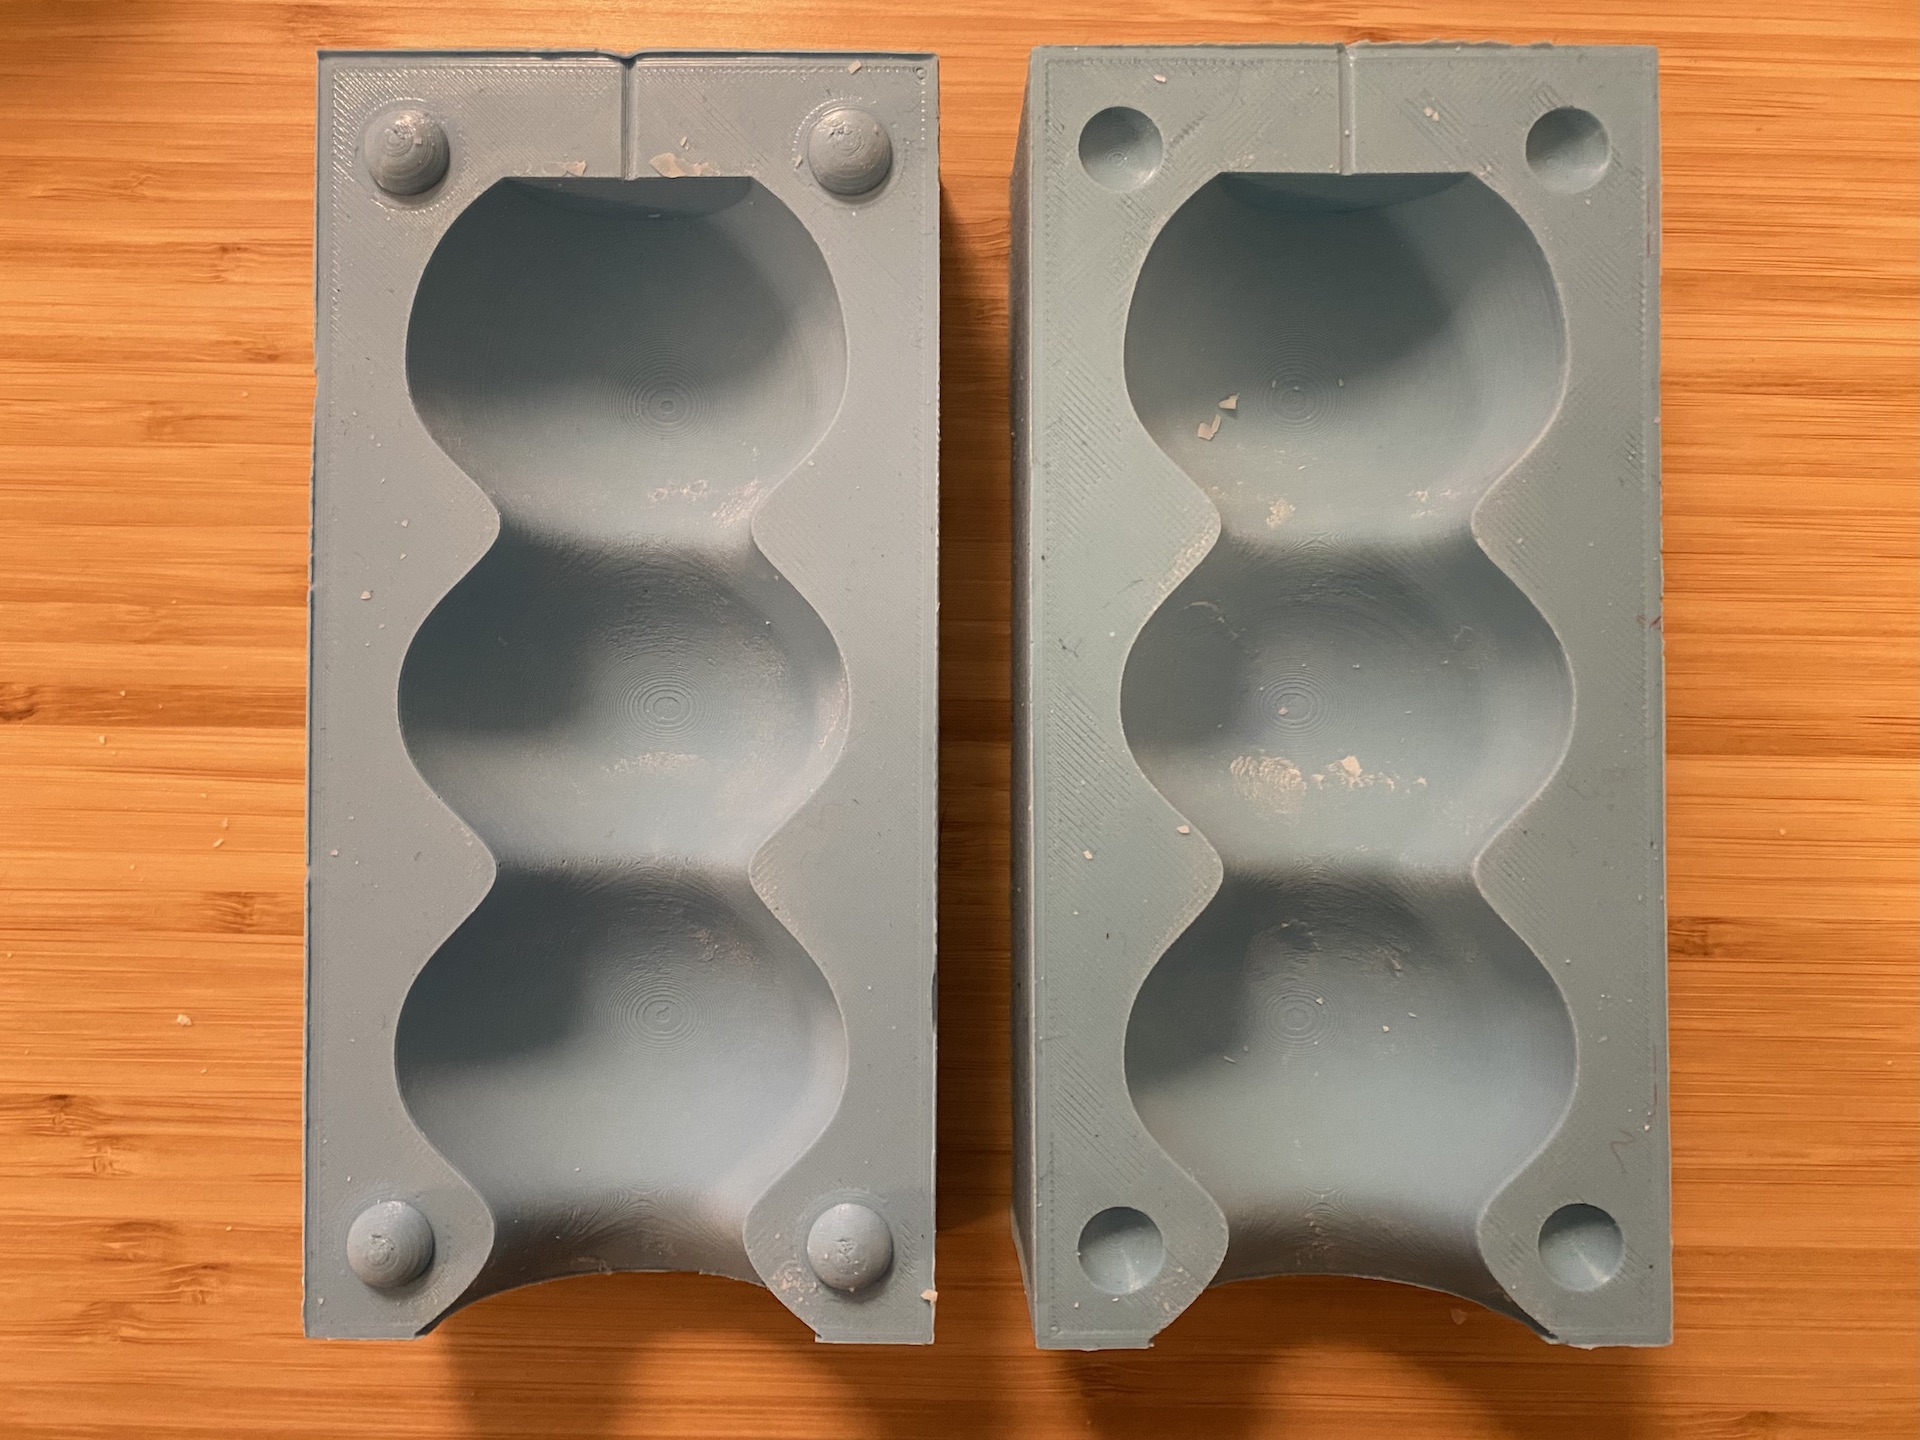
This collection has three different designs, a spikey candle, a curvy candle, and a folded candle. The designs were inspired by some of the sketches and 3D printed forms that I looked at during the lighting design project.
After being modeled with grasshoper and baked, I modified the candle designs in Rhino as two part molds. Each mold design has a small opening at the top for the wick to run through the mold.
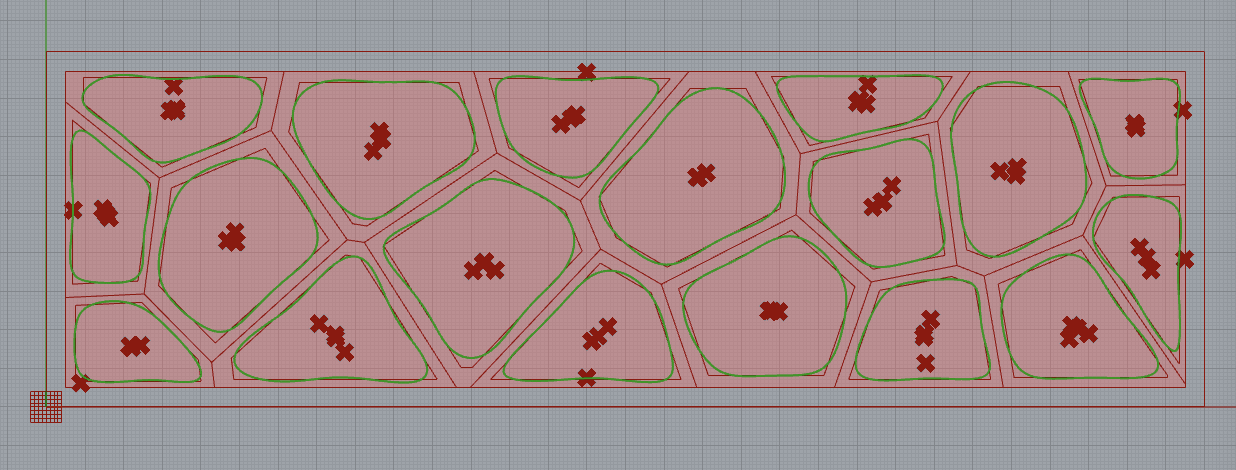
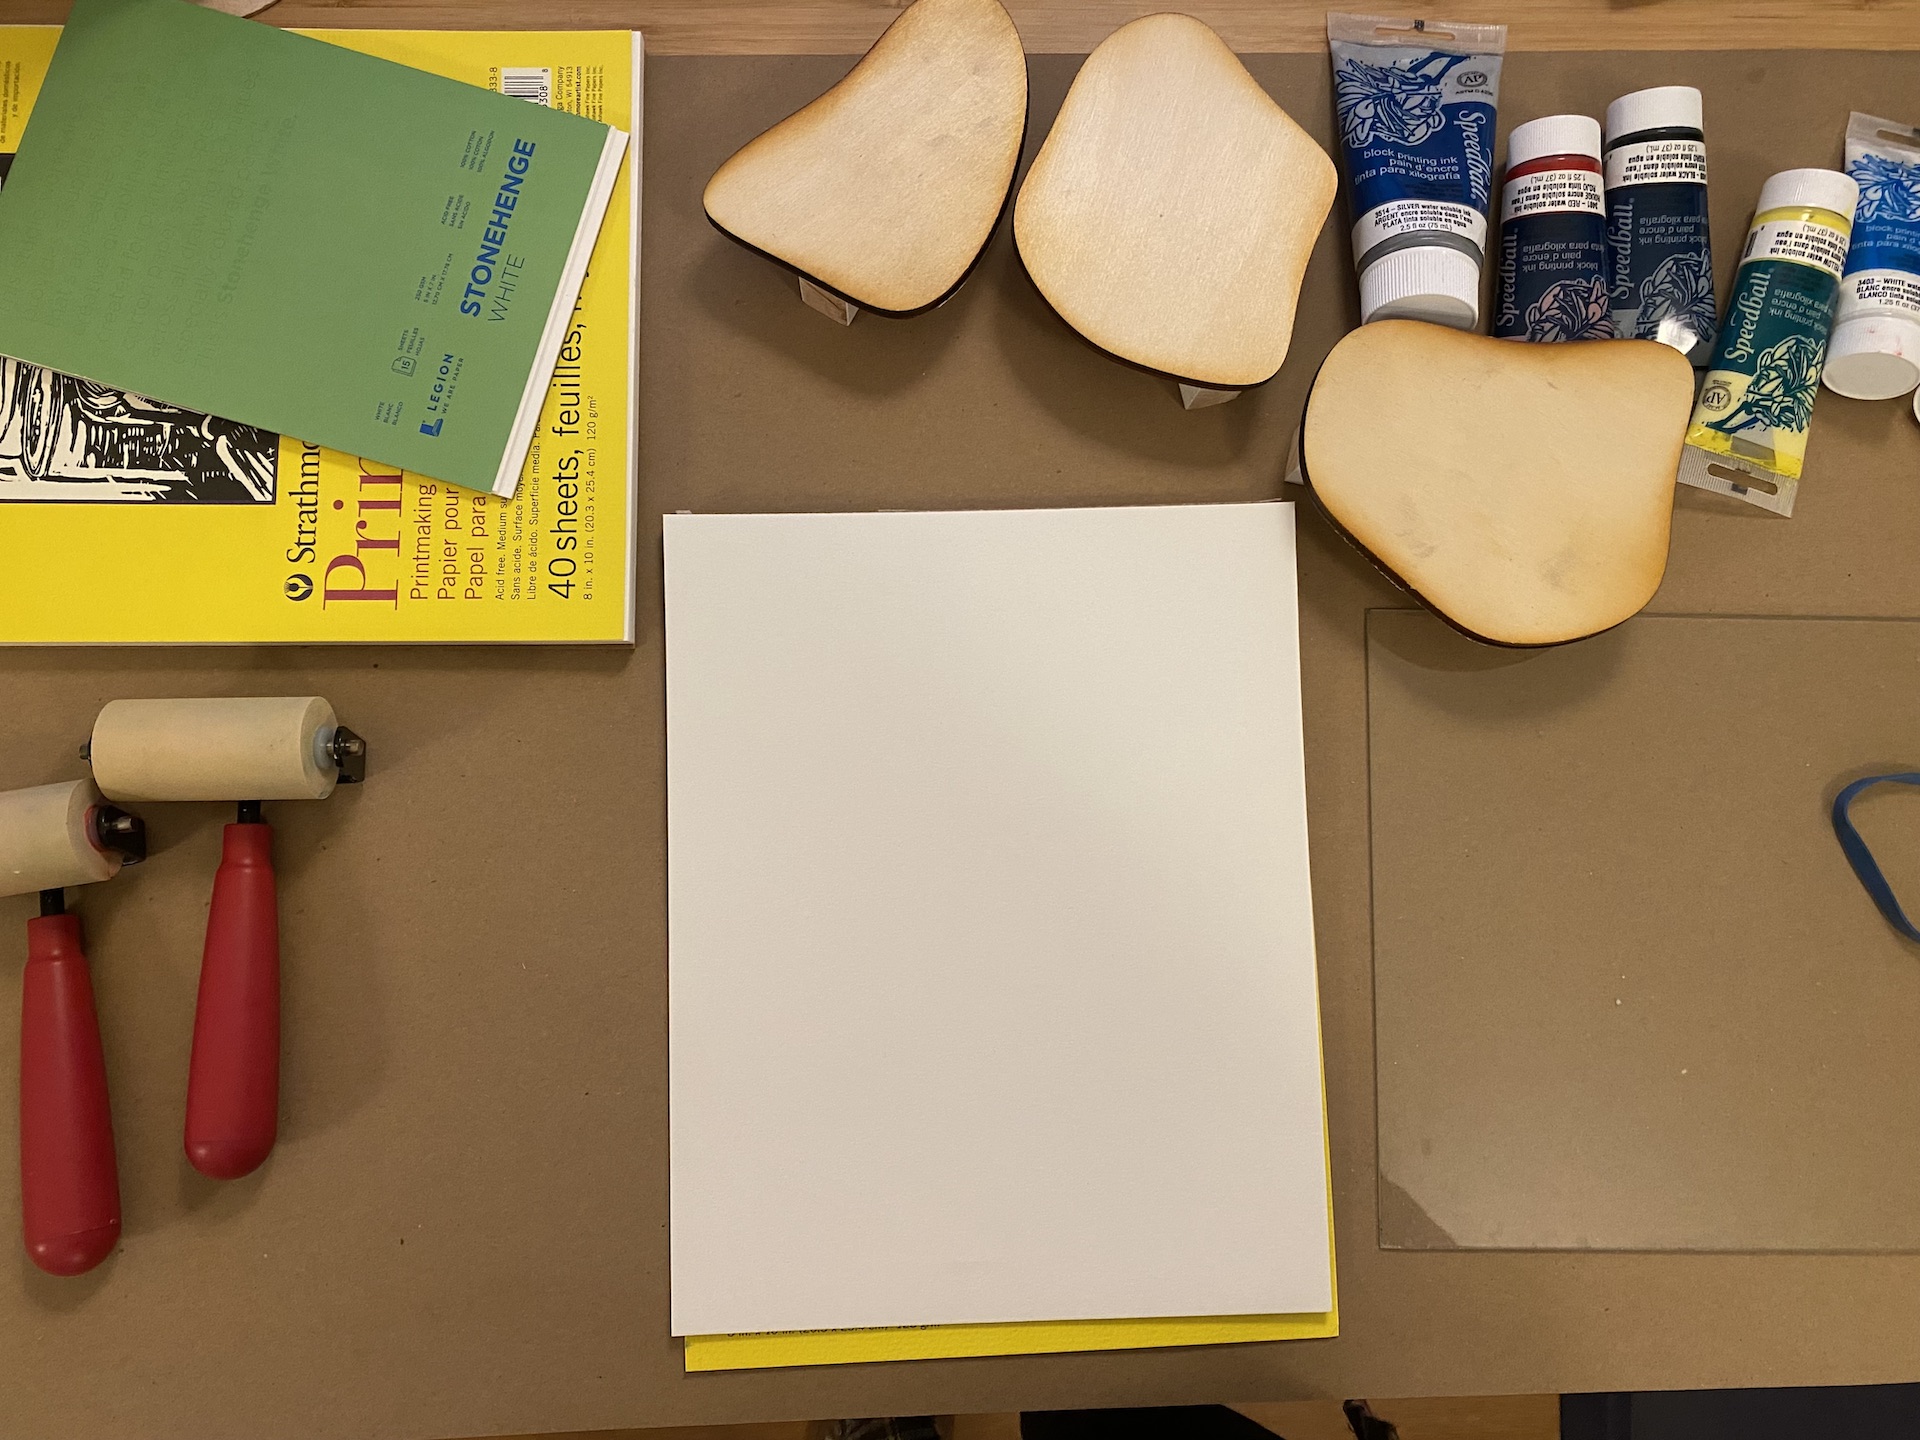
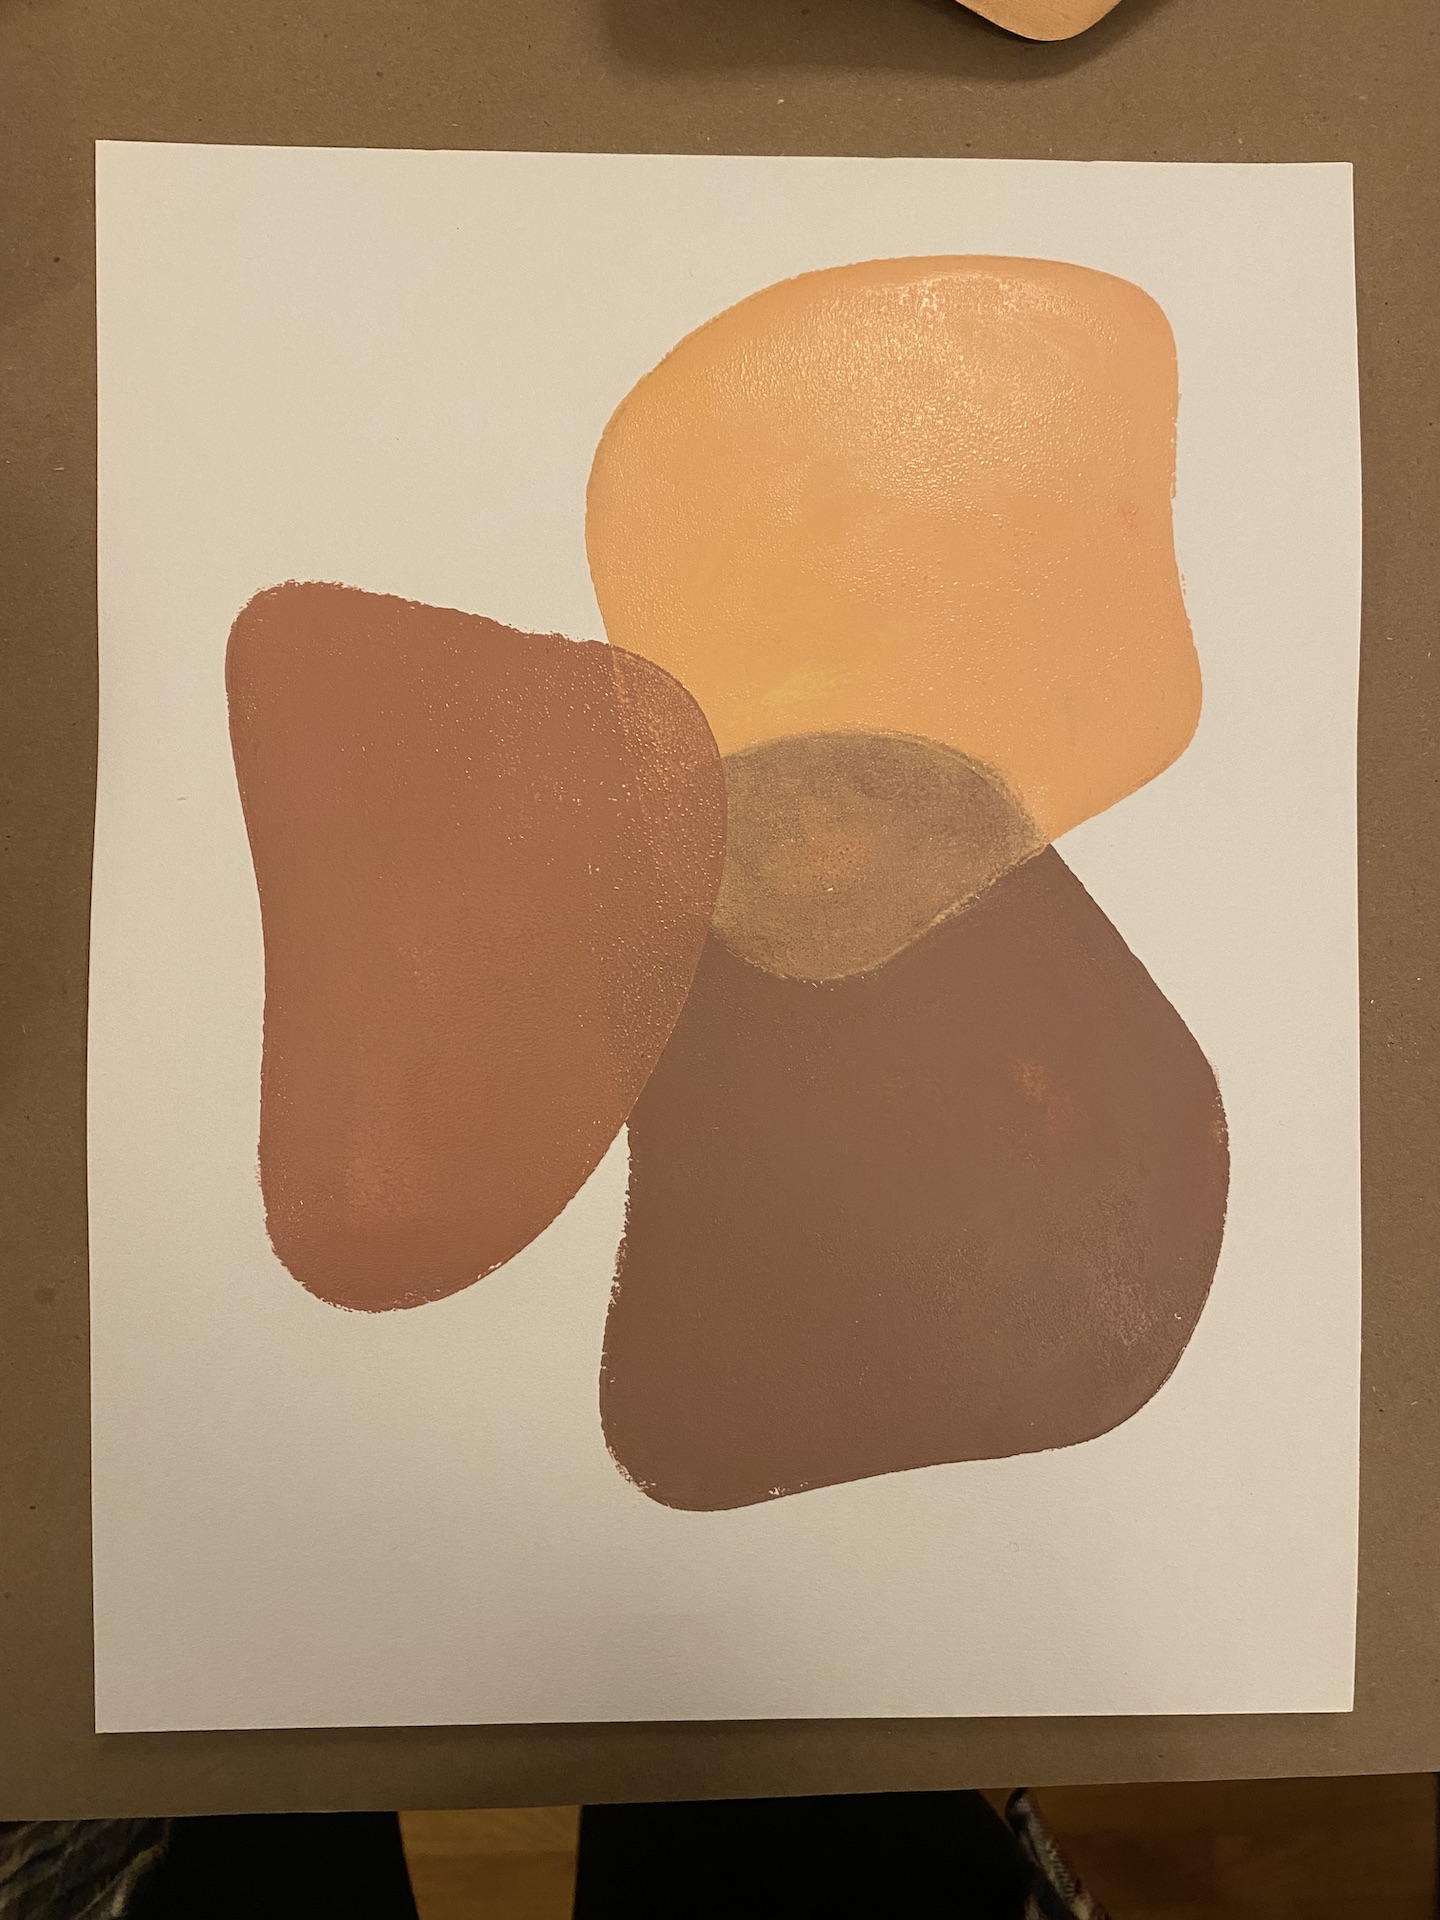
Block Prints
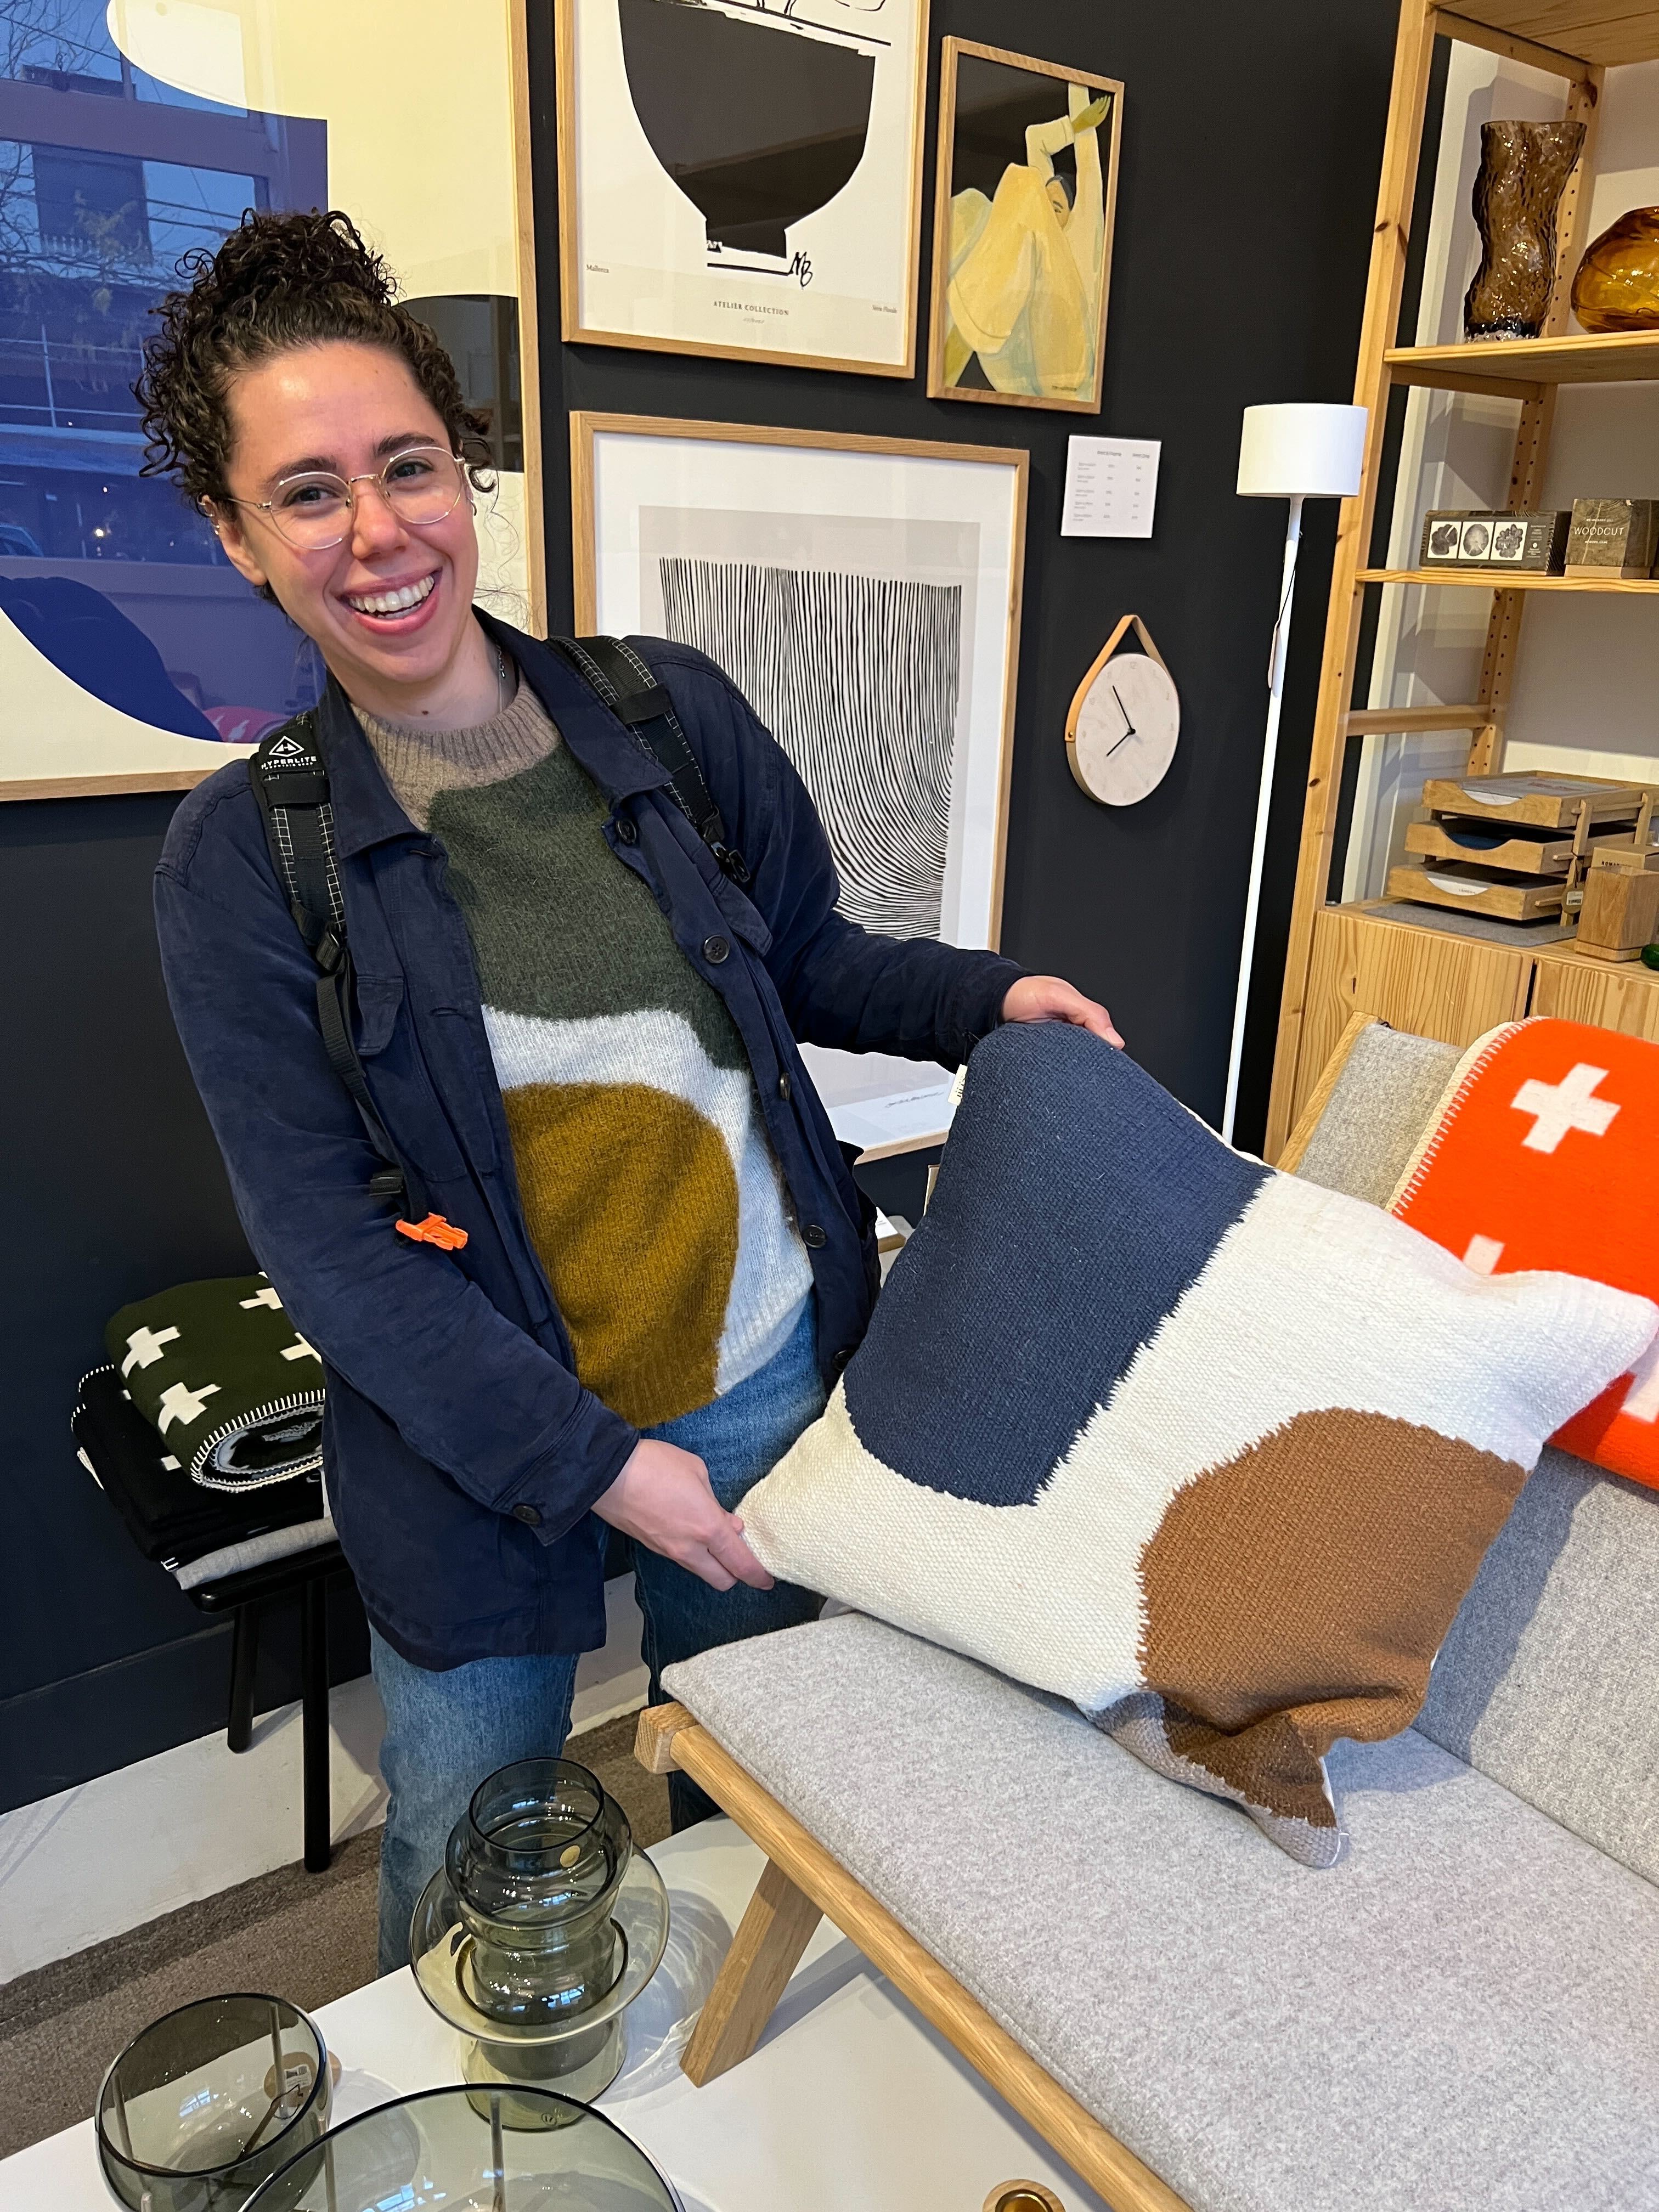
I was inspired by all the trendy blob designs in my life and wanted to make some blob prints to hang on my wall. Most of you have probably seen me in my current favorite sweater. But, in case you haven’t, here’s a photo of me wearing the blob sweater with a matching blob pillow (that I unfortunately don’t own because it was like a $150 pillow).
I made the blobs ny creating a voronoi pattern in grasshopper and modifying the readius of the edges to make them look like curvy blobs.
Fabricating
Using 3D Printing, Mold Making, and Laser Cutting
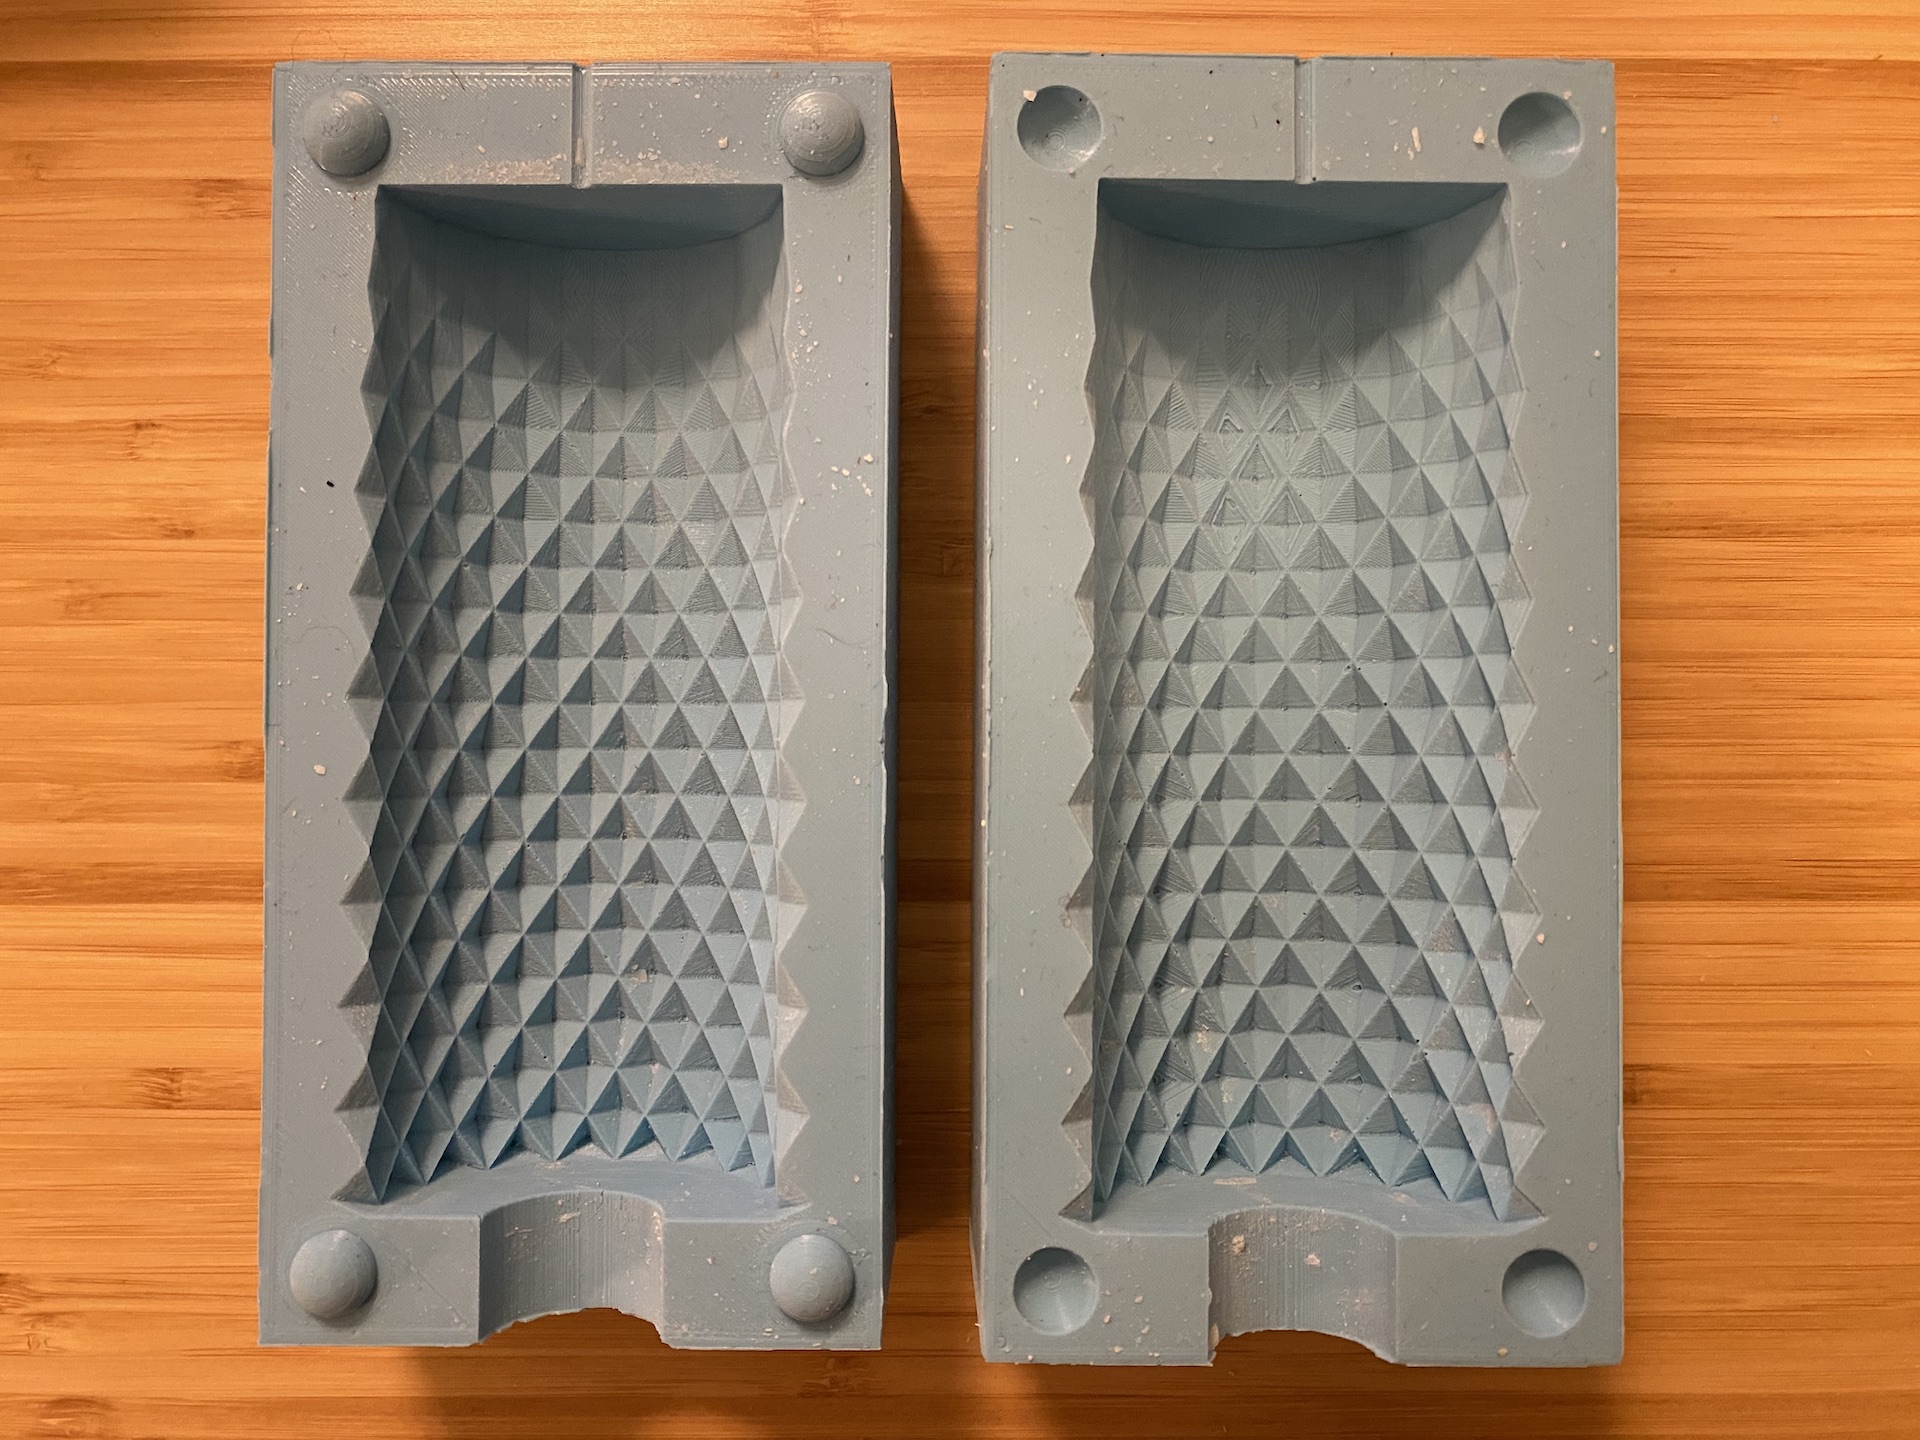
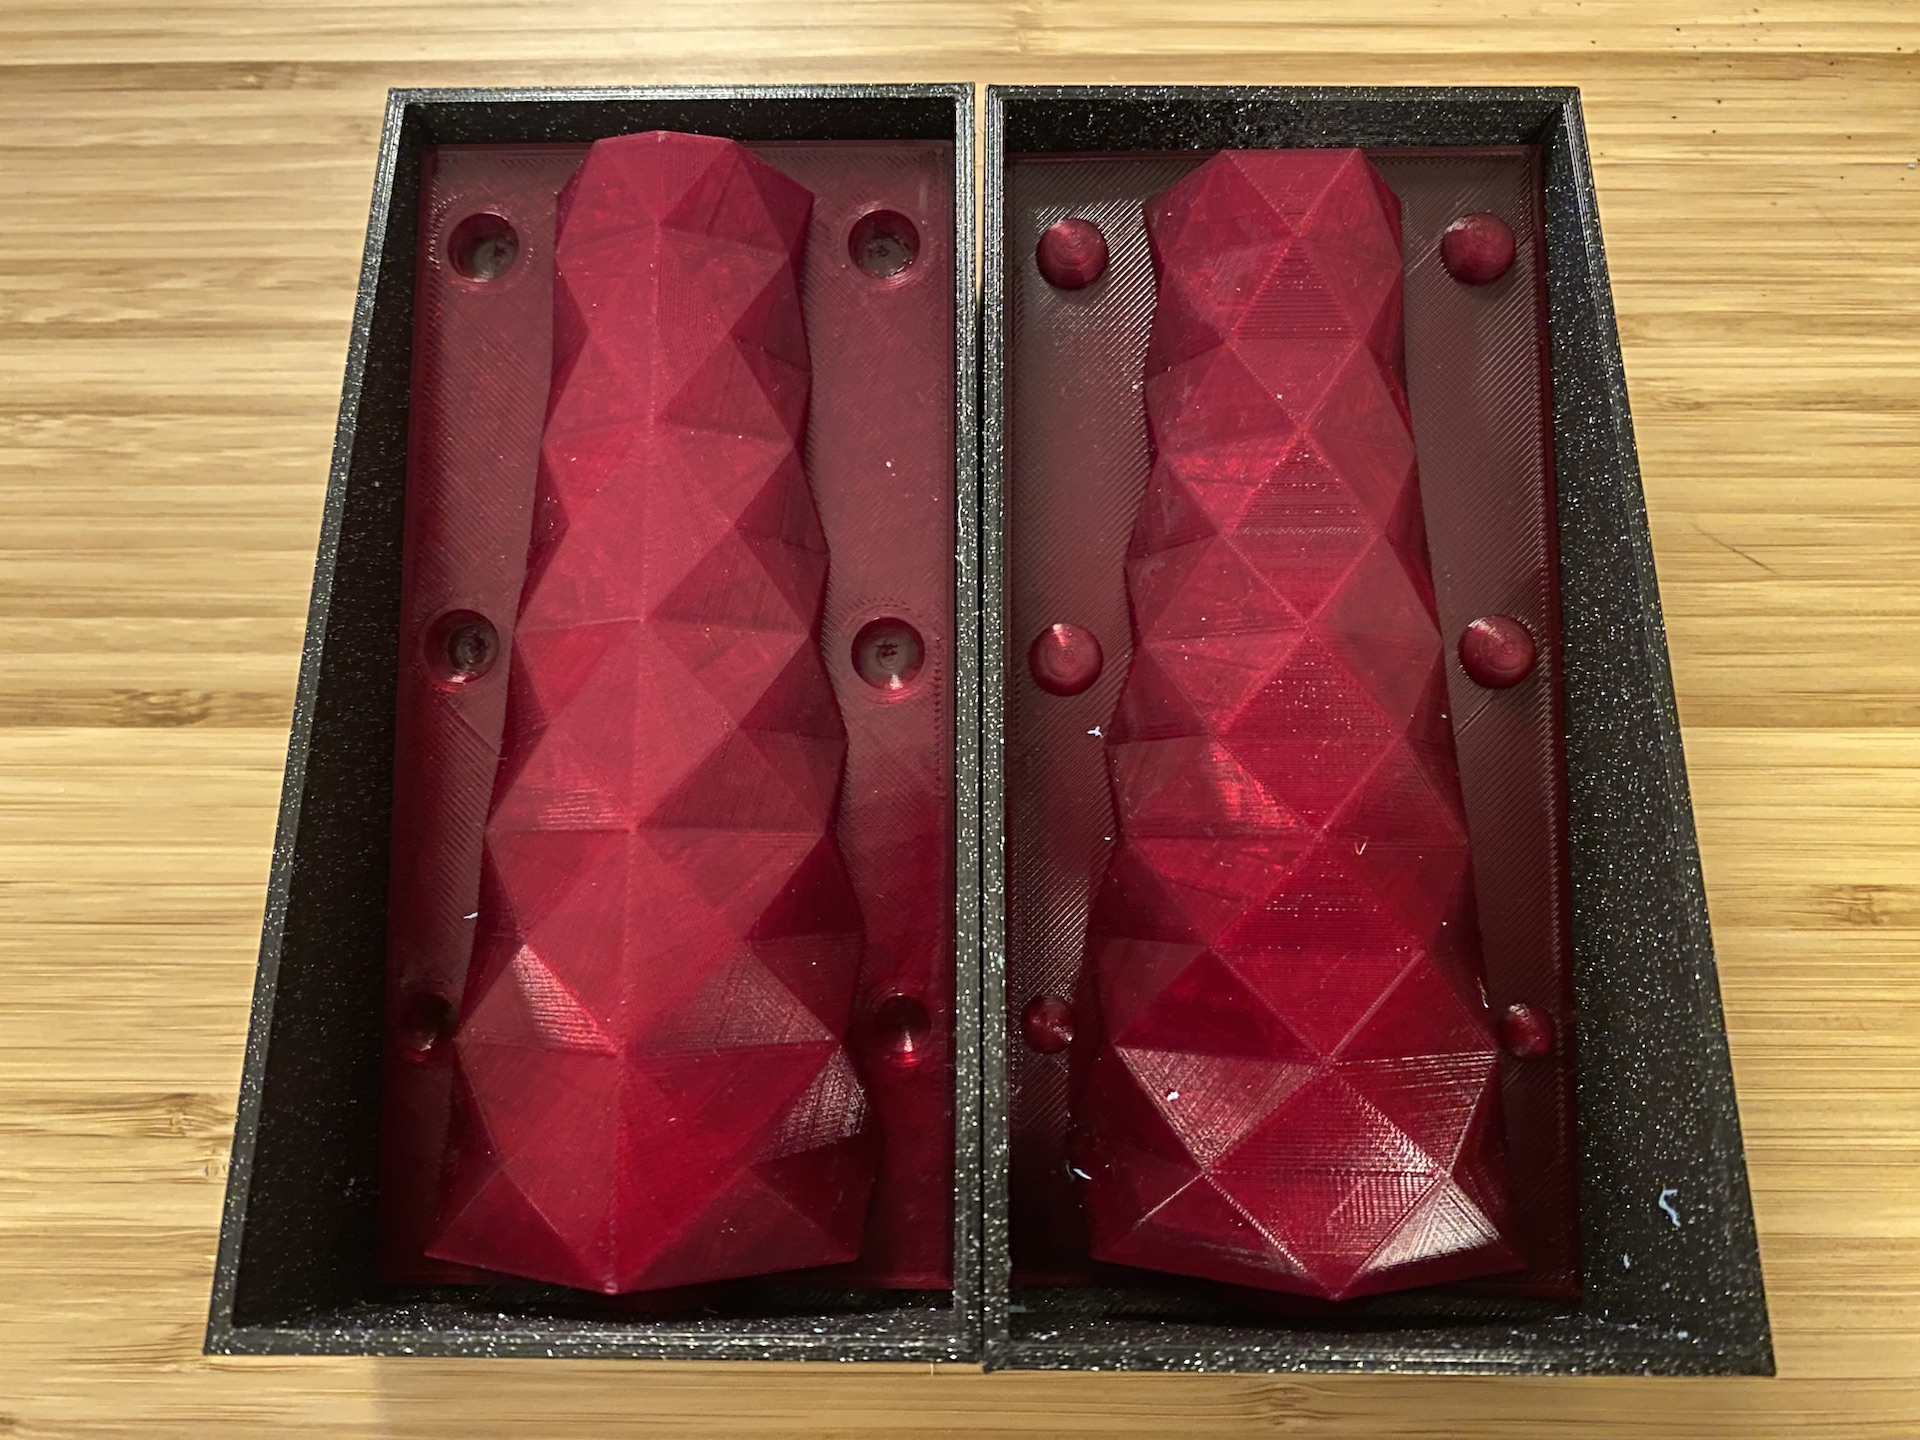
Diamond Candle
I started with the diamond candle, which uses the same grasshopper file that I made for my lamp assignment, with different inputs. It was fun to see the power of parametric modeling in action by making two very different designs from the same grasshopper file.

Slicer Settings:
- Dynamic Quality
- Z seam: Sharpest corner
- Top/bottom pattern: Zig Zag
- Bottom initial layer: Zig Zag
- Print temp: 210ºc
Side A took 11 hr 21 min to print and Side B took 12 hr 11 min.
Cast wth Oomoo 25
- Side A (thin bas/protruding keys): 230 grams Part A, 300 grams Part B
- Side B (thick base/inset keys): 215 grams Part A, 280 grams Part B
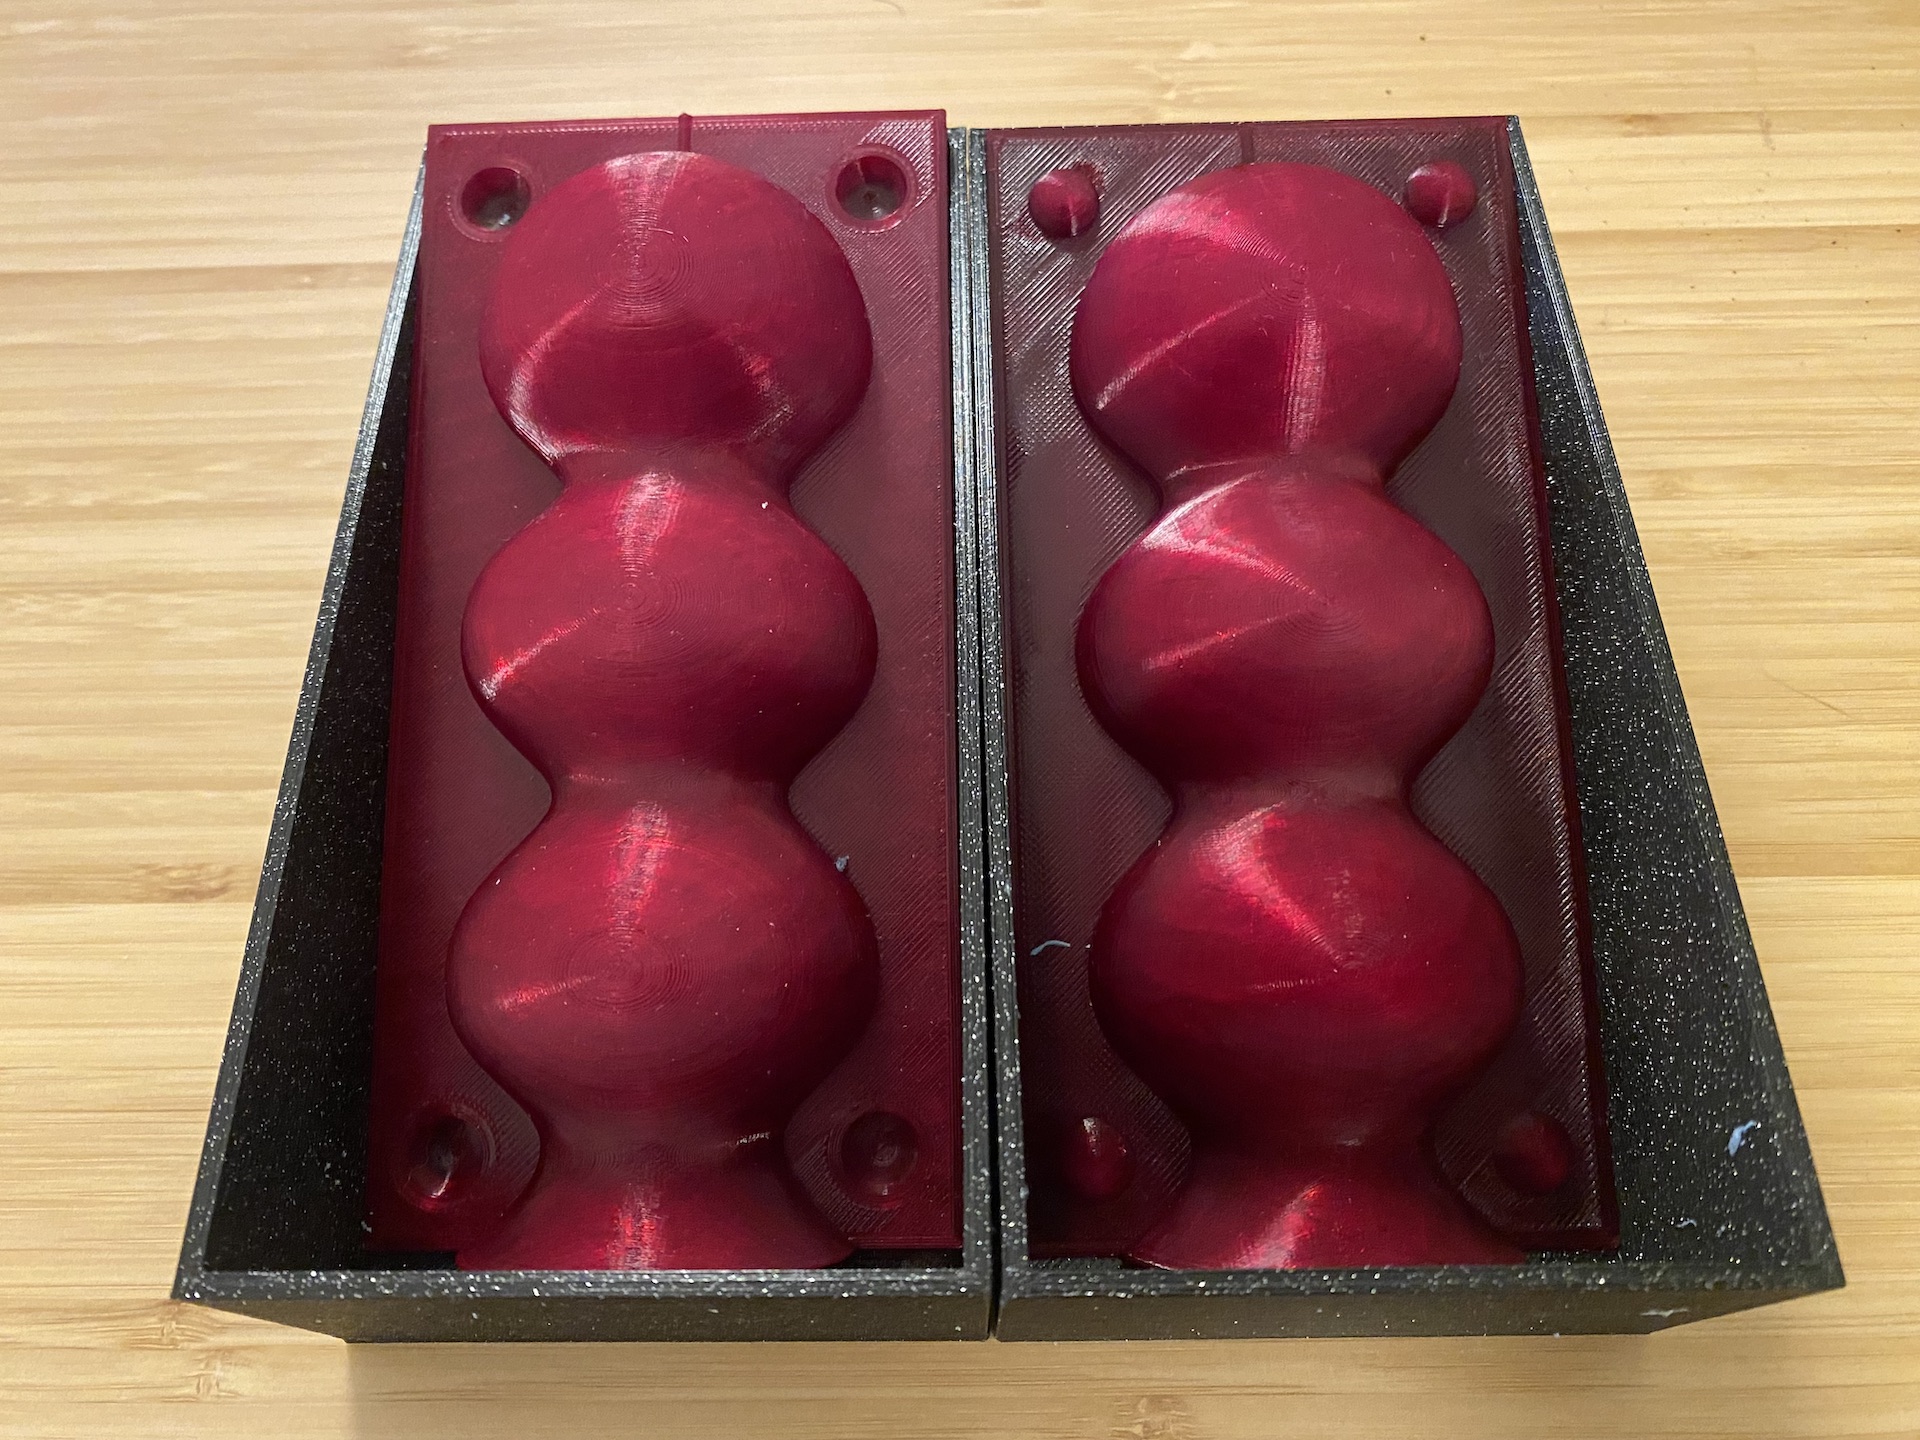
Curvy Candle
Printing the Curvy Candle mold came with a whole bunch of 3D printer issues that needed troubleshooting.
Slicer Settings:
- Dynamic Quality
- Z seam: Right
- Top/bottom pattern: Zig Zag
- Bottom initial layer: Lines
- Print temp: 210ºc
Side A took 8 hr 8 min to print and Side B took 9 hr 22 min.
Cast wth Oomoo 25
- Side A (thin bas/protruding keys): 230 grams Part A, 300 grams Part B
- Side B (thick base/inset keys): 215 grams Part A, 280 grams Part B
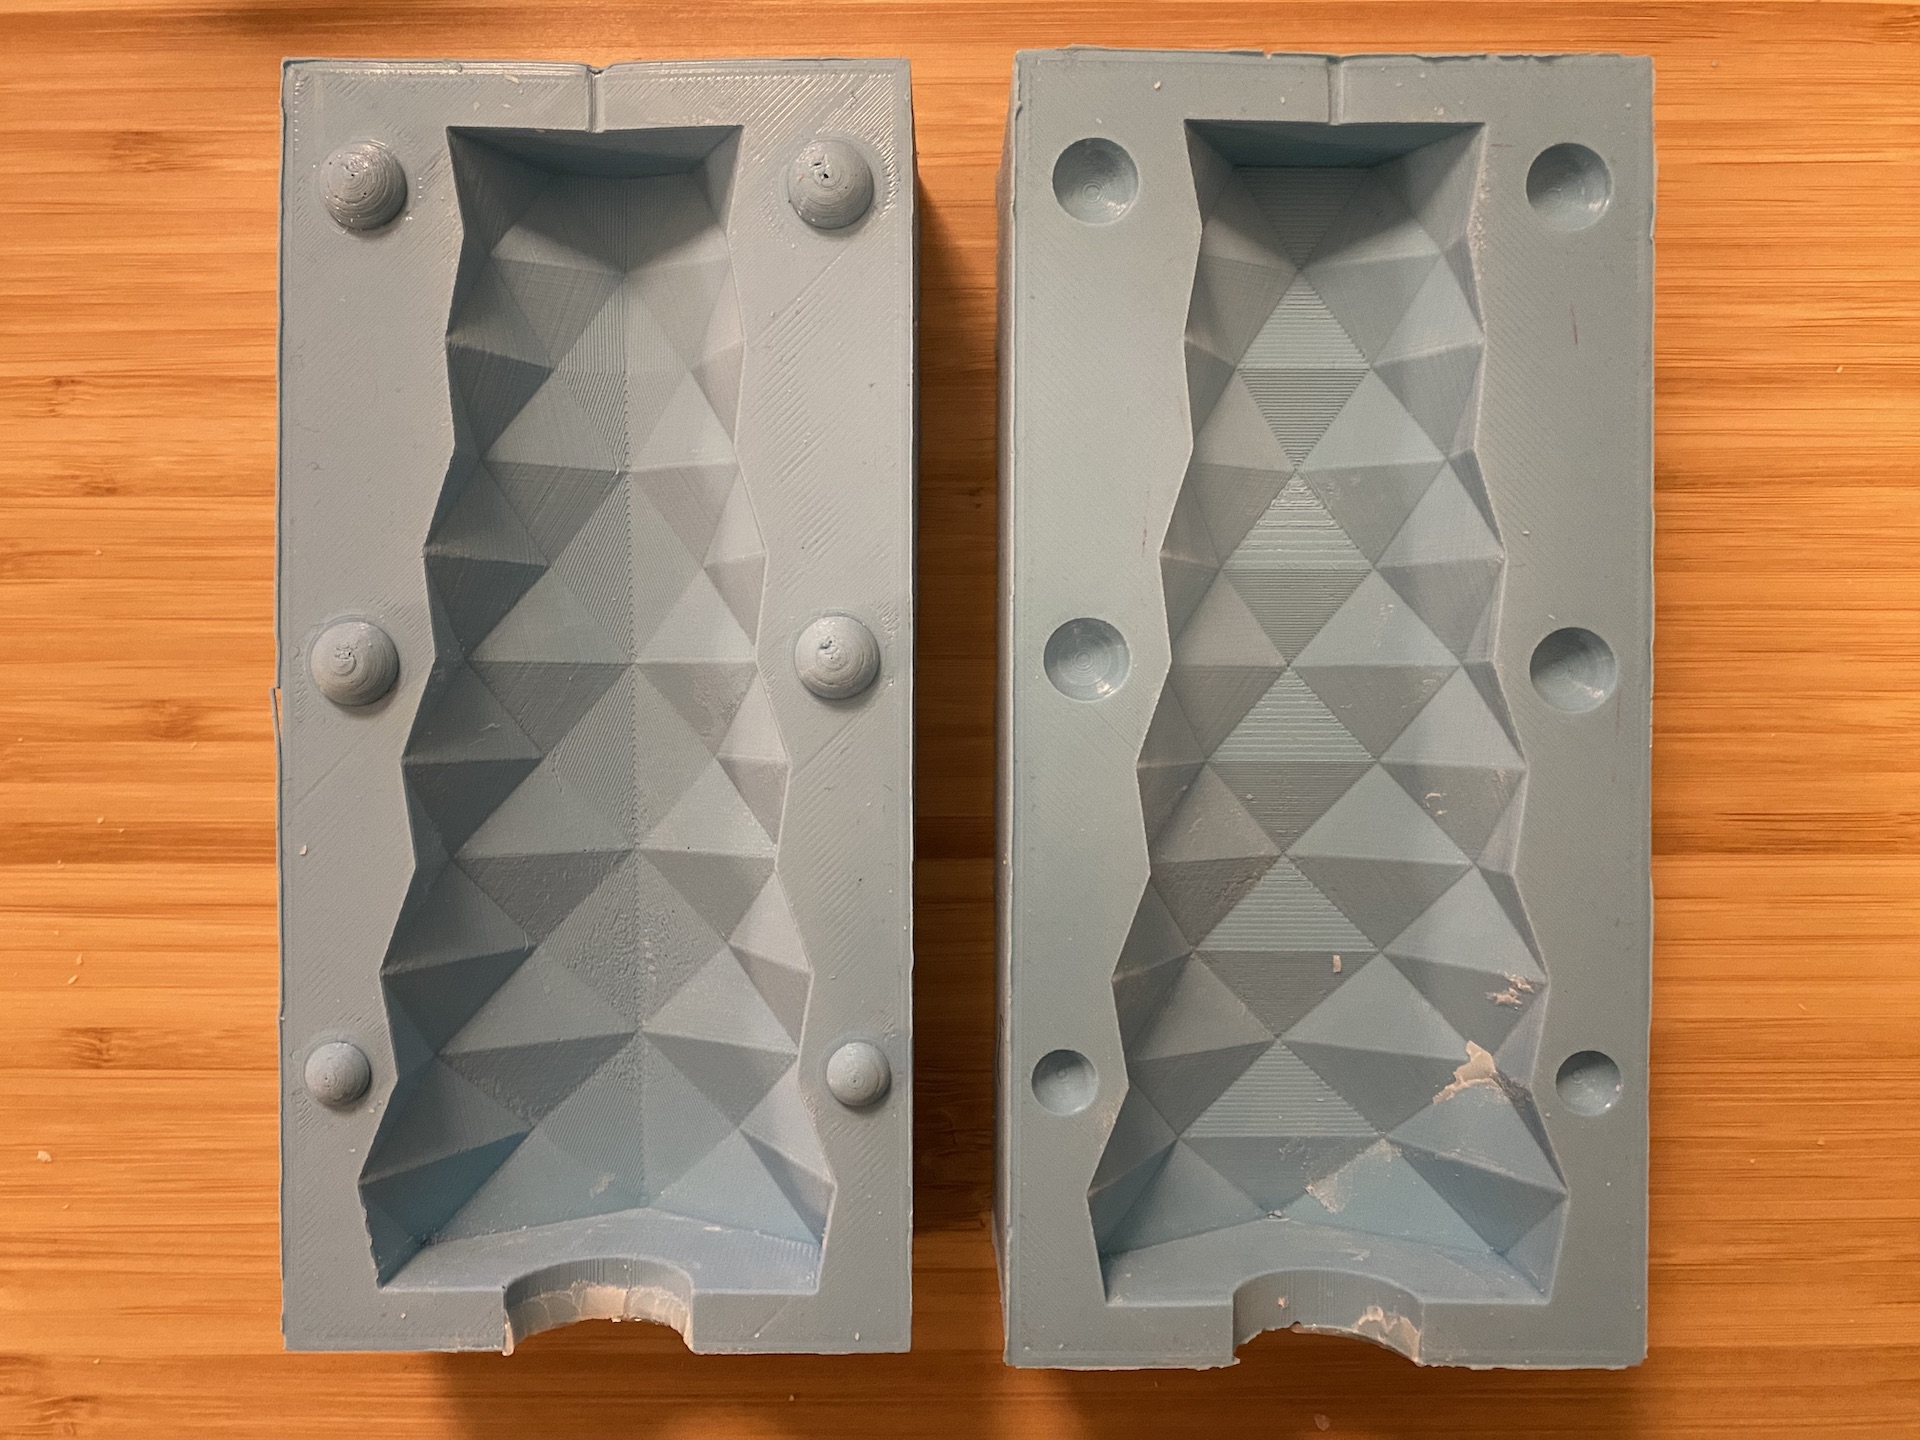
Folded Candle
The last candle mold I printed was for the folded candle design. Thankfully, with few issues (other than some surface scarring, which thankfully didn’t impact my molds much).
Slicer Settings:
- Dynamic Quality
- Z seam: Right
- Top/bottom pattern: Lines
- Bottom initial layer: Lines
- Print temp: 205ºc
Side A took 8 hr 20 min to print and Side B took 9 hr 47 min.
I had been having intermittent issues with my 3D printer. Most notably that I was getting constant thermal runaway warnings (I’m pretty sure that I wasn’t actually having thermal runwawy, and instaed it was being falsley triggered). I had to restart the ‘Folded Candle Side A’ print 3 times because of this. After this print, I took some time to do 3D printer maintainiance and replaced the Thermister, Heater Cartridge, and nozzle. Replacing the heater cartridge seemed to solve my issue for now, though I have been getting bad surface scarring on many prints (an issue I hadn’t had until this project). Fun times troubleshooting pesky 3D printers.
On a somewhat related tangent, the internet forums seem to think the Ender 3 issues stem from Creality switchig the motherboard on their printers due to supply shortages. There’s been quite an uproar over this change. Turns out my printer is one of the ones with the new (and cheaper) motherboards. This might be a contributing factor to why so many people in the class have been having issues with their 3D printers.
Cast wth Oomoo 25
- Side A (thin bas/protruding keys): 230 grams Part A, 300 grams Part B
- Side B (thick base/inset keys): 215 grams Part A, 280 grams Part B
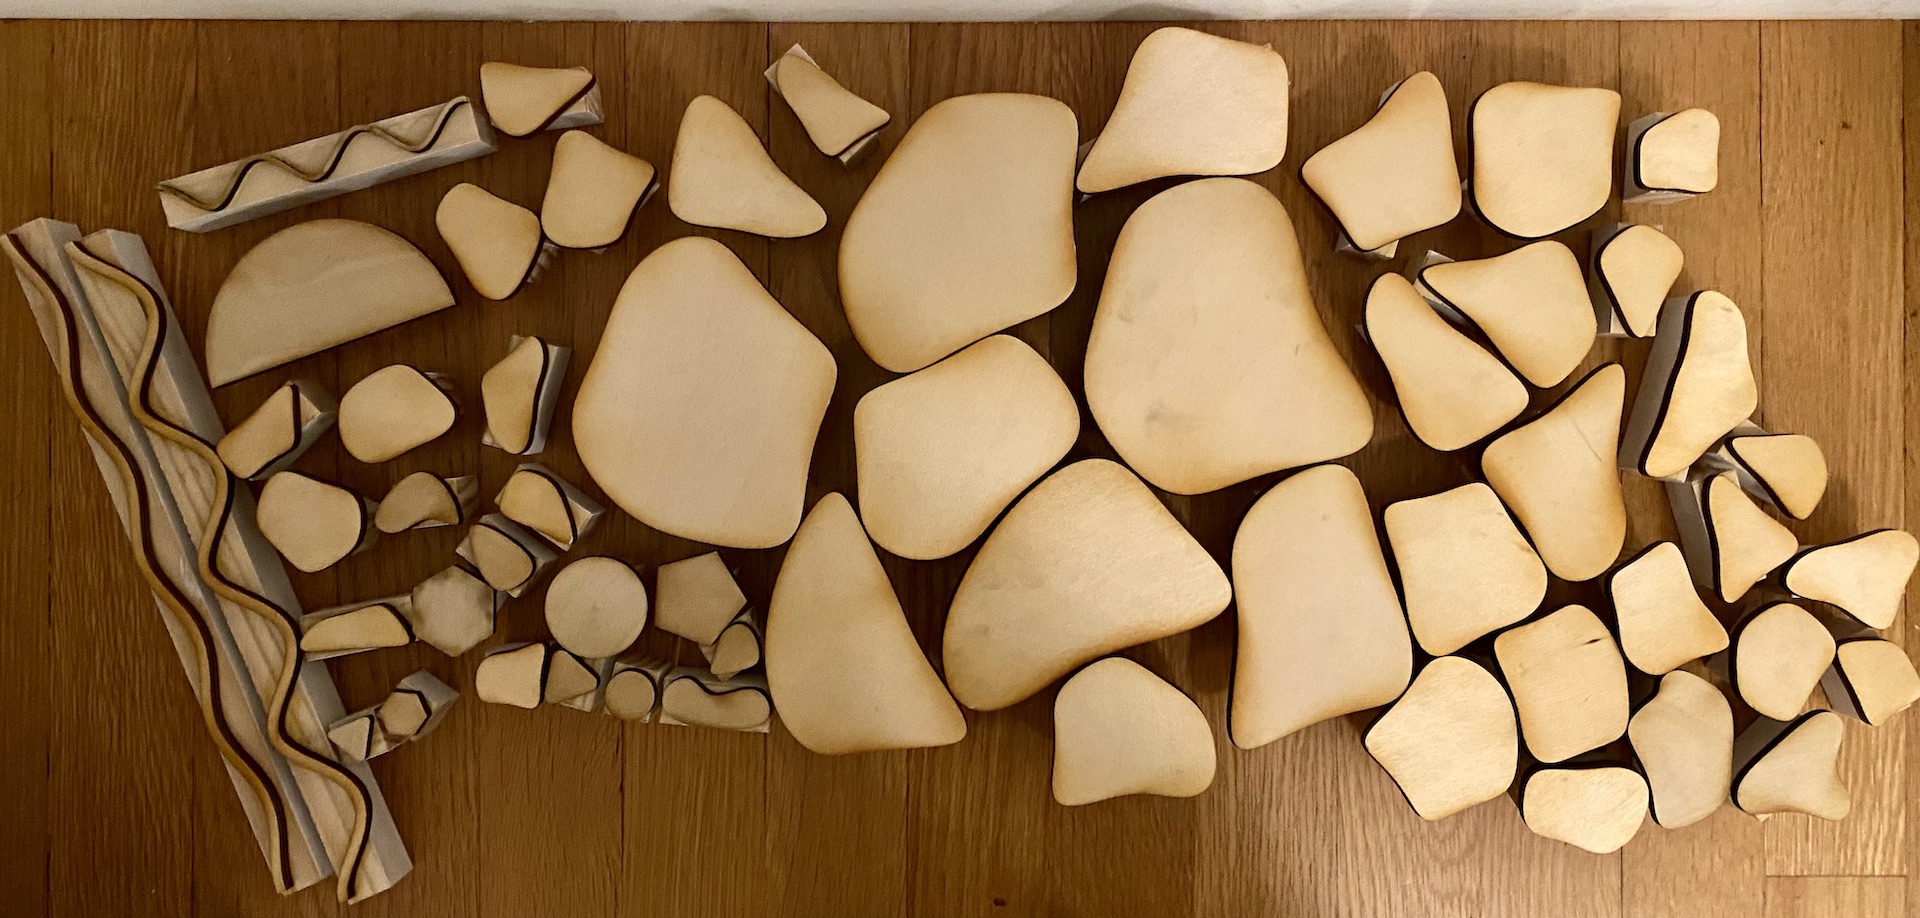
Block prints
The block print fabircation was rather quick. After prepping for laser cutting by lauying out the designs and setting them to the correct line width and color (red, 0.01pt), it only took about 6 minutes to laser cut the entire 12”x24” sheet. I used the Universal Laser Cutter at The 8. To set the power, I used the preset material database and selected general medium wood with 0.25” thickness.
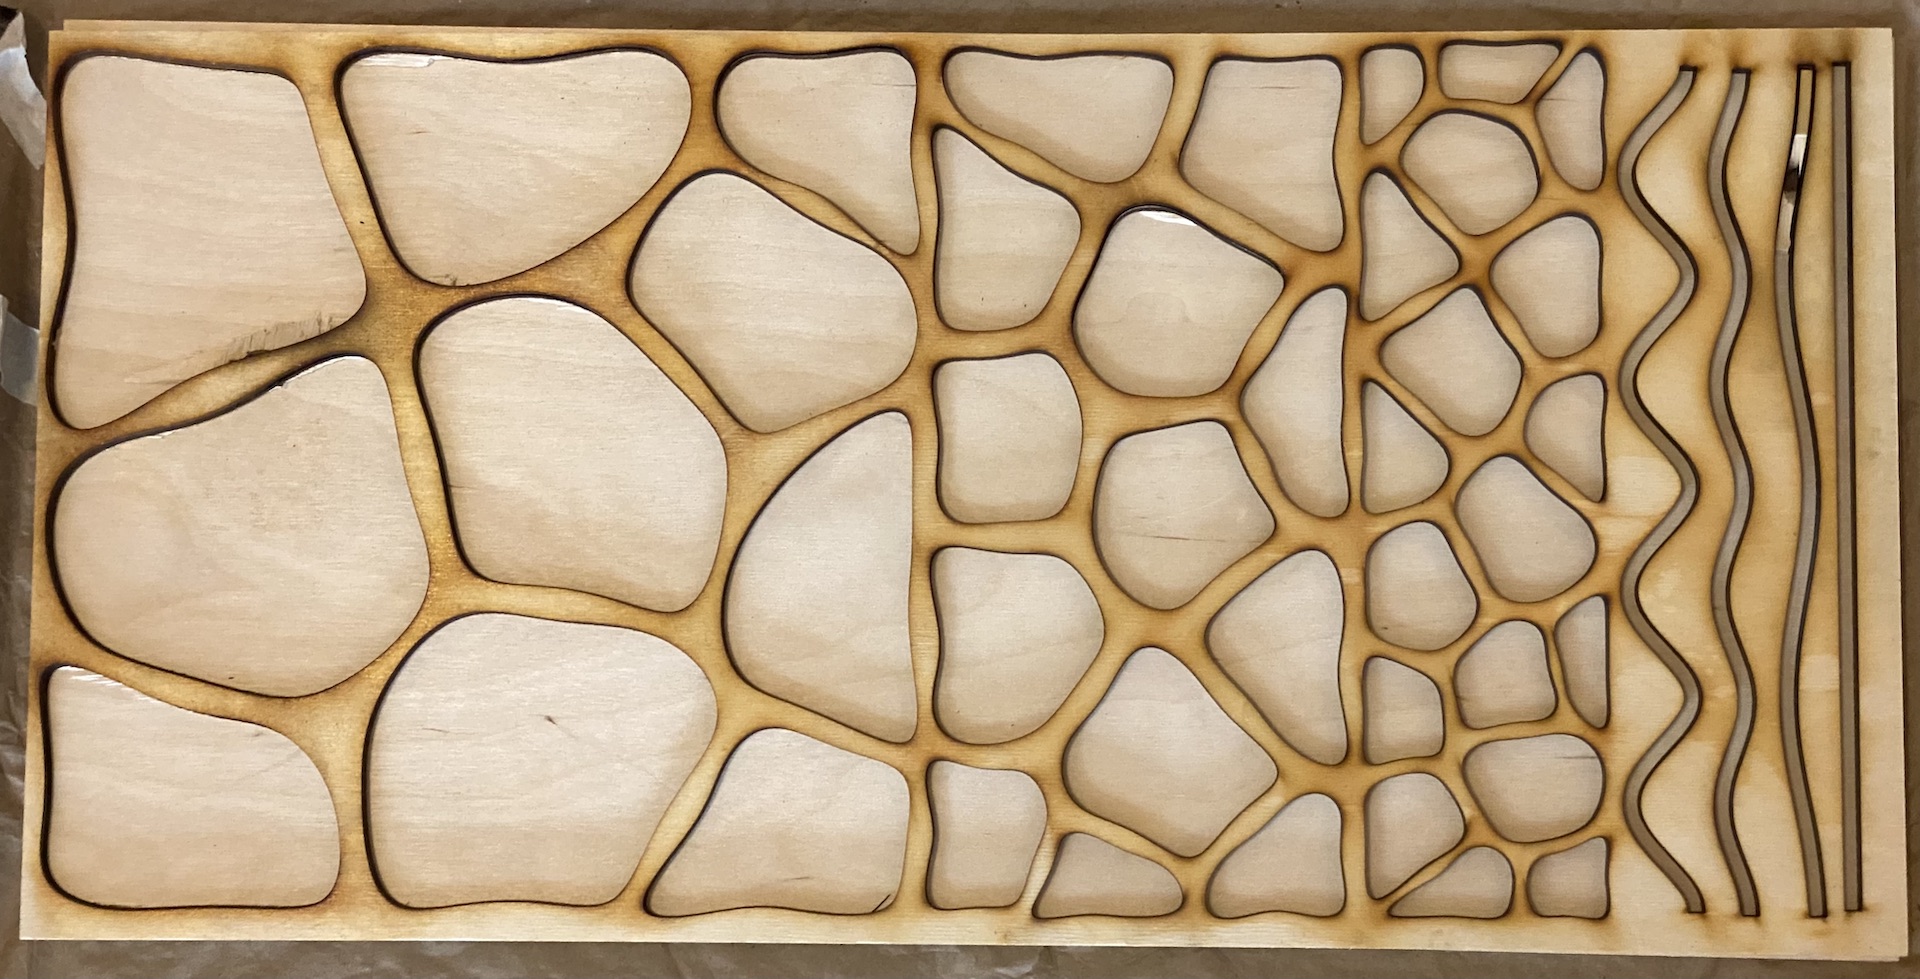
After laser cutting the shapes, I glued some handles to the back of each piece (using scrap wood I had laying around). I did this to make it easier to print with the blocks.
Making
Now, with everything fabricated, I was ready to start making candles and prints!
Candles
My kitchen was turned into a candle factory for a few days. I heated wax pellets in boiling water until they melted into a smooth wax. I found the optimal pouring temperature for this wax to be around 165ºf.
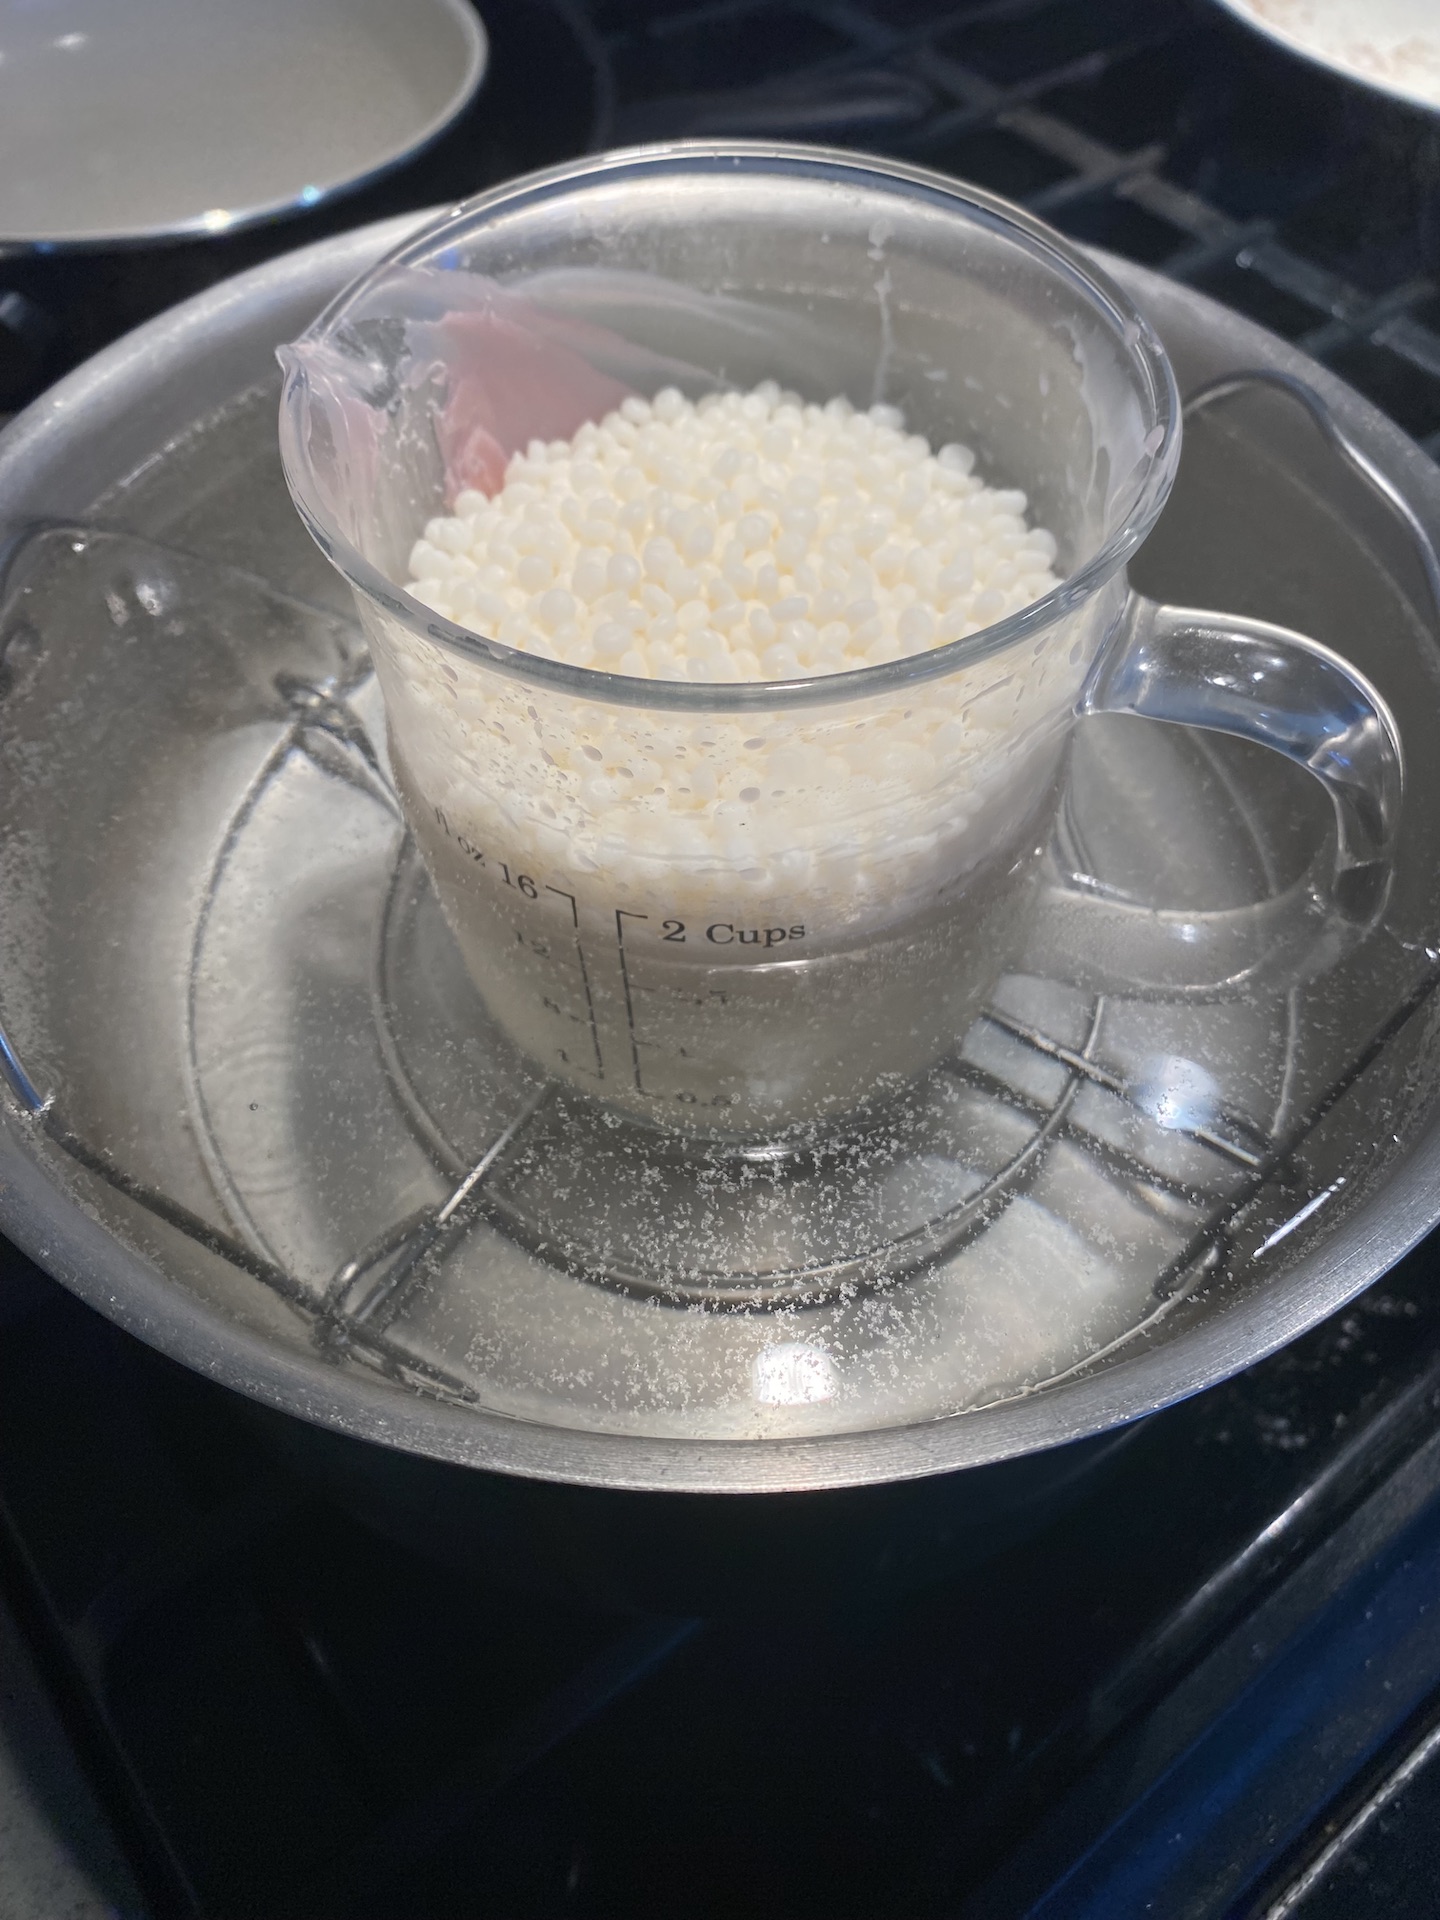
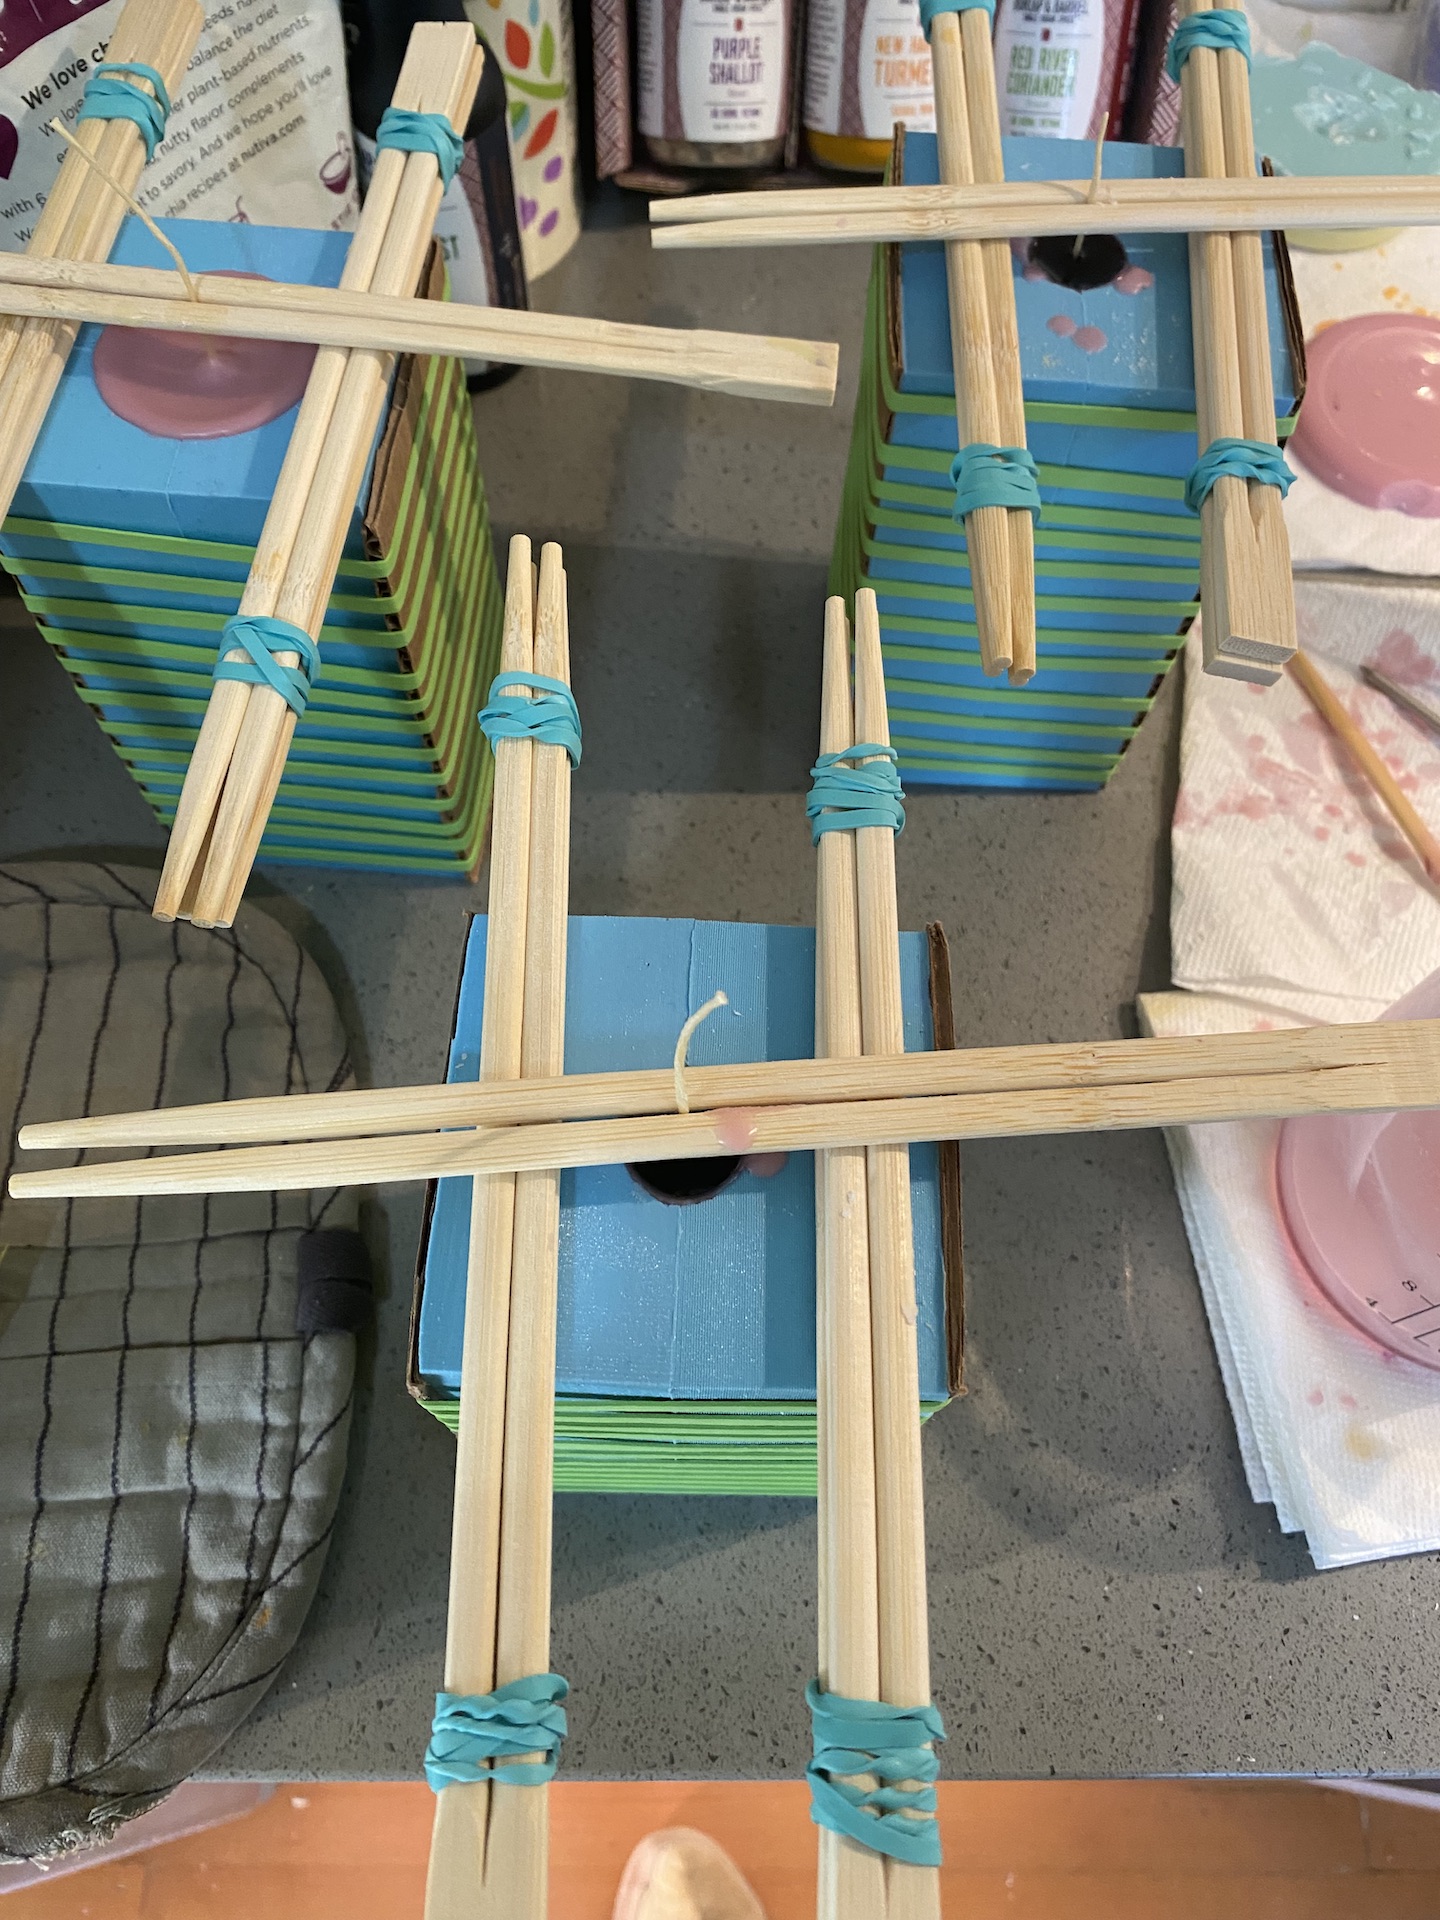
I don’t have one of those fancy candle wick holders, so I repurposed some chopsticks to do the job. I had the best results letting the candles sit in the silicone molds for about 3-4 hours before de-molding.
One of the things I wanted to explore in this round of candle making was color. I purchased a bunch of different color chips from Zenith supplies (color chips are surprisingly cheap, $1.10 for 11 chips). I finally found a use for these cute mini jam jars that I’d been holding onto. This was a good way for me to figure out which colors would be best for the aesthetic I was trying to achieve with my candles.
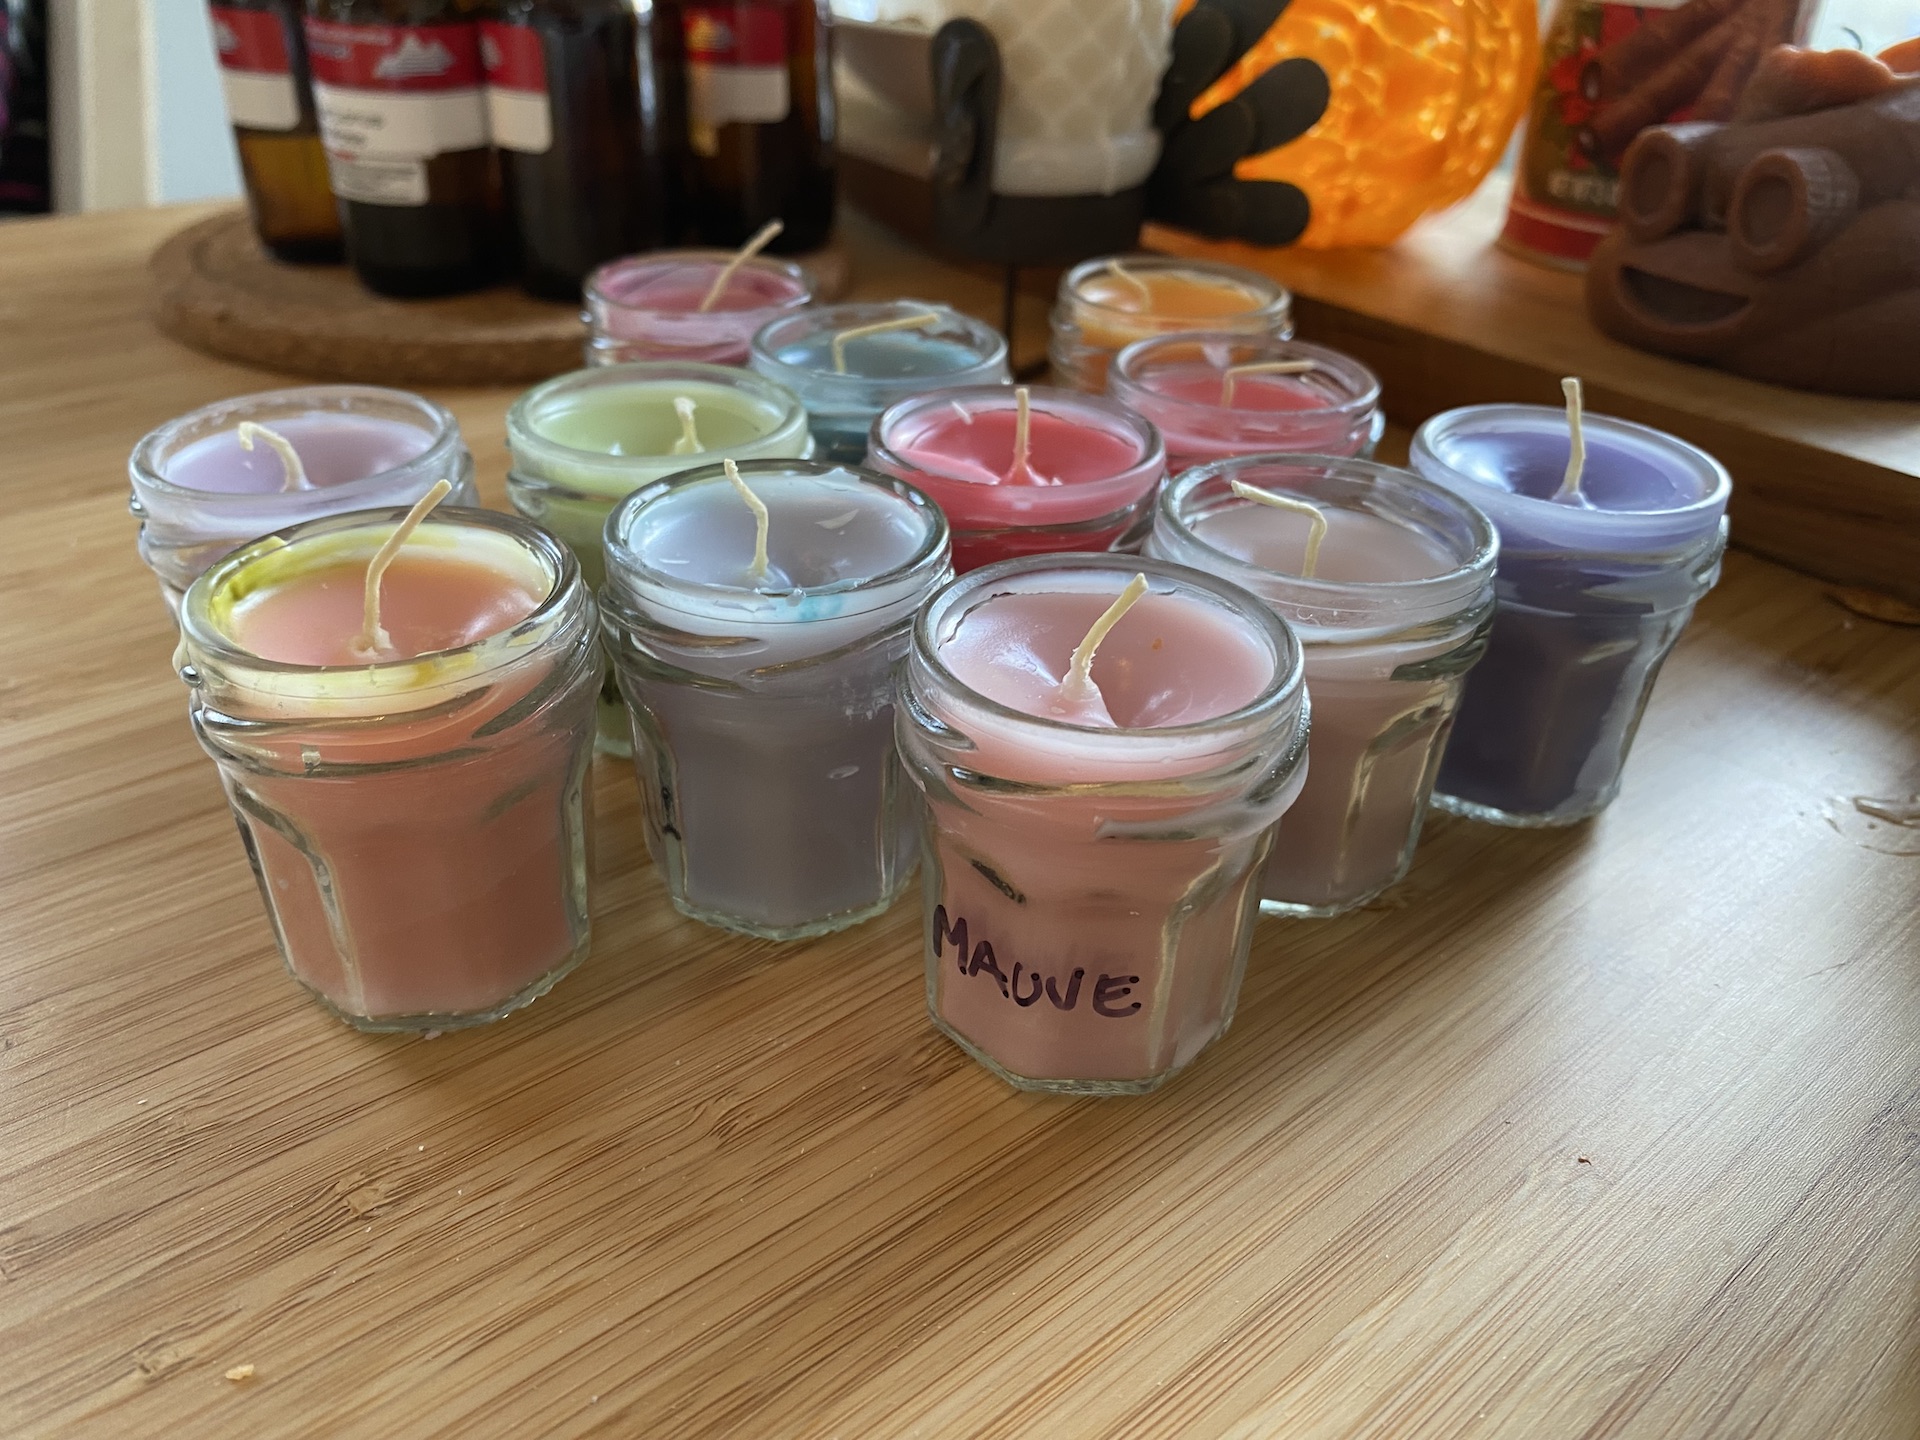
There will be quite a few people in my life receiving candles as holiday gifts!
Paper Prints
After making ~25 candles, I decided that was enough and switched over to making paper prints with my printing blocks. Here’s the set up before I made a huge mess and covered everything in printing ink.
Acknowledgements
Thanks to Junchao for always being available and having great advice! Best TA!
Thanks to Akshay who also made candles for his final project. It was so helpful to have someone doing the same projcess to toss ideas around with.
This is probably a delayed shout out, but thanks to one of my classmates (I think it was Paisley) who, during the casting and mold making lecture, suggested casting candles instead of plaster. That quick comment sent me down a really fun path exploring candle making!
It was also fun to get to chat about CNC milling with Rodrigo and Minah! (even though, in the end, I didn’t end up CNCing any printing blocks)
Assets
Files
Parametric candles Rhino File (.3dm)
Diamond candle Grasshopper file (.gh)
Curvy candle Grasshopper file (.gh)
Folded candle Grasshopper file (.gh)
Printing blocks Rhino file (.3dm)
Printing blocks Grasshopper file (.gh)
Resources Referenced
I tried to do as much parametric modeling as I could without directly following tutorials. However, I did use a few resources when I got stuck. Most notably were:
@RhinoGrasshopper GH.parametric design YouTube channel
@nsenske Nick Senske’s YouTube channel